In the world of visual creation, images play an essential role. They are present in many fields such as graphic design, advertising, fashion, art, and web design, of course. However, generating high-quality images can sometimes be a complex and time-consuming challenge.
This is where Midjourney comes into play. Midjourney is an innovative platform that uses artificial intelligence to automatically generate images. Whether you're a professional creator or a passionate individual looking to bring your ideas to life, Midjourney offers you a powerful and efficient way to create visually appealing and high-quality images.
The benefits of using Midjourney are numerous. In addition to saving you valuable time, Midjourney allows you to explore endless creative possibilities. You can create realistic, stylized, or whimsical images by manipulating various attributes such as color, texture, shape, and much more. Midjourney also features a gallery of examples that serves as a true source of inspiration, allowing you to discover new ideas and spark your creativity.
At first glance, the tool may seem straightforward to use; you write a phrase, and an image is created, but it actually conceals dozens of features that will enable you to go even further in image generation. In this guide, we detail the main features of the tool, allowing you to generate even more precise and advanced images. You will learn how to leverage pre-trained models, customize the attributes of generated images, and refine the results to achieve unique compositions.
1. Prompts
The heart of using Midjourney lies in creating prompts. A prompt is simply a description that guides the artificial intelligence model in the desired direction. The Midjourney bot breaks down the words and phrases of a prompt into smaller elements, called "Tokens," which can be compared to its training data and used to generate an image. Prompts thus play a fundamental role in generating quality images, and with Midjourney, you can create prompts of varying complexity.
1.1 Simple Prompt

Simple prompts are a basic approach to guiding the model in generating images. They usually consist of a sentence or a short description that conveys the overall idea of the image you wish to generate. For example, if you want to create an image of a seascape, your simple prompt could be "A beautiful sunset over the ocean with crashing waves."
To create an image using a prompt:
- Add the Midjourney Bot in direct message on Discord
- Enter the command "/imagine"
- Add your prompt
💡 Tips: The Midjourney bot works best with simple, short phrases that describe what you want to see.
1.2 Advanced Prompt

Advanced prompts offer greater flexibility and more precise control over the image generation process. They allow you to refine specific attributes and characteristics of the generated image. You can, for example, add an image to your prompt, introduce separators within the same prompt to create "multi-phrases", or even add parameters (See point 6. Use of Parameters) to adjust ratios, aspects, quality, etc.
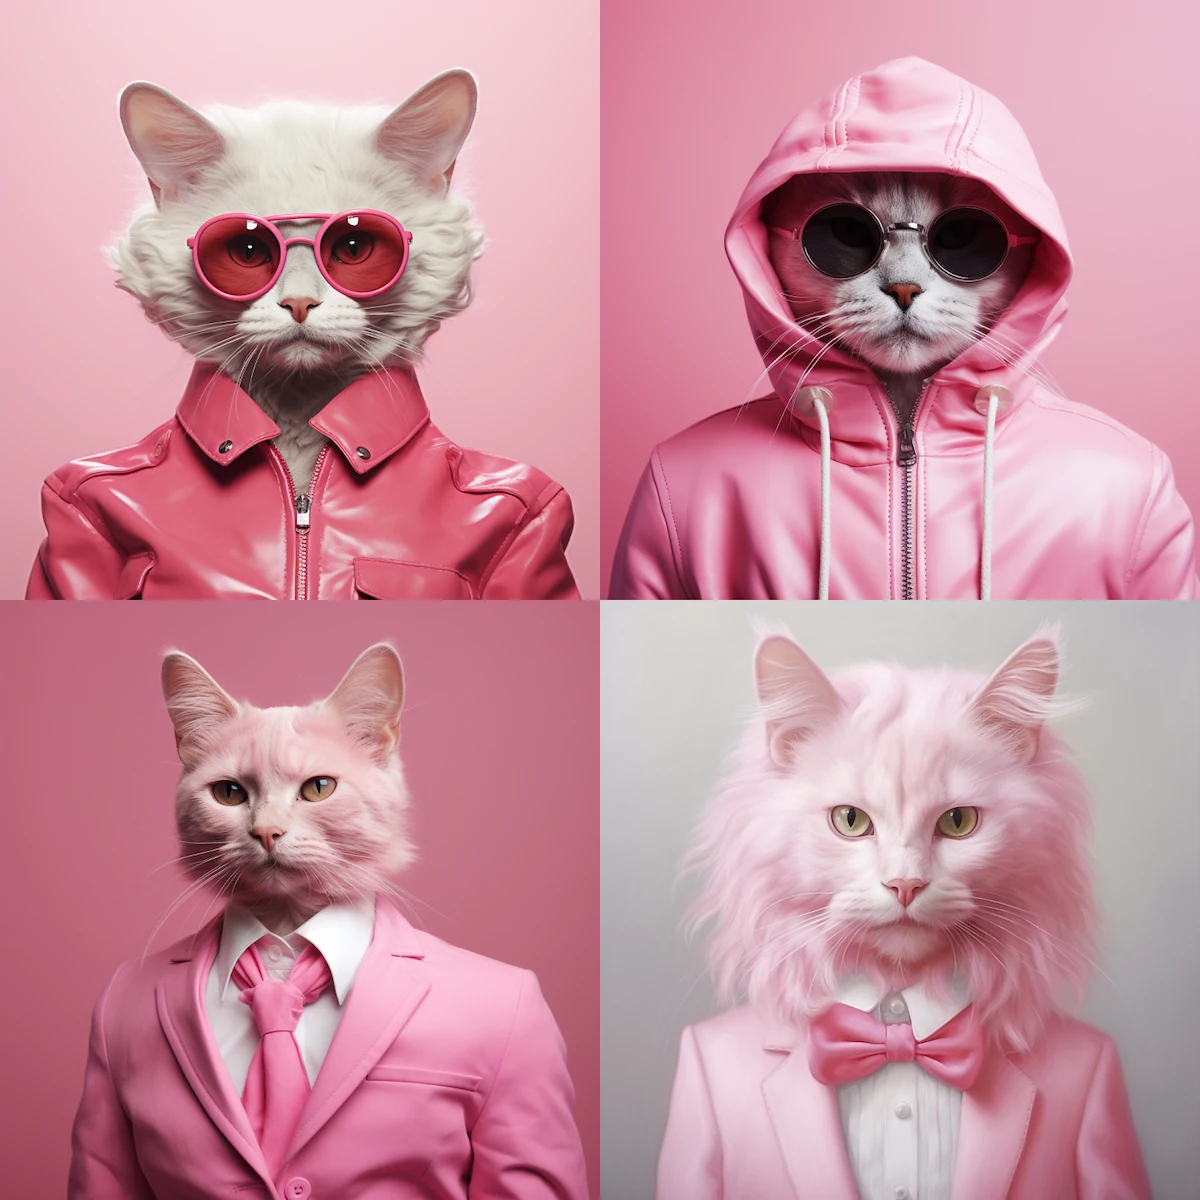
💡 Tips: Integrate a style, color, period, location, etc. into your prompts using the symbols: <>. Example: /image <pink> style cat
1.3 Writing a Prompt Well

- Length of Prompts: Prompts can be simple, but a more descriptive prompt is preferable to achieve a unique rendering. Focus on the main concepts you want to create.
- Grammar: The Midjourney bot does not understand grammar, sentence structure, or words as a human would. Word choice is also important. More specific synonyms generally work better. Use commas, parentheses, and dashes to organize your ideas, but be aware that the Midjourney bot will not interpret them reliably. However, Midjourney Version 4 is slightly better at interpreting traditional sentence structures.
- Focus on What You Want: It is better to describe what you want rather than what you don't want. For example, if you request a party "without a cake," your image will likely include a cake. To exclude a specific object from the final image, you can use the "--no" parameter during advanced prompt generation.
- Think About Important Details: Anything not specified may surprise you. Be as precise or vague as you like, but note that everything you do not mention will be random. Be clear about the context or important details for you, such as the subject (person, animal, character, place, object, etc.), medium (photography, painting, illustration, etc.), environment (café, forest, urban landscape, beach, etc.), lighting (warm light, dark ambiance, bright lighting, etc.), colors (bright, vibrant, monochrome, etc.), mood (calm, serene, lively, joyful, etc.), and composition (facial expression, wide shot of landscapes, etc.).
- Use Collective Nouns: Plural words leave room for randomness. Try to use specific numbers. For example, "three cats" is more precise than "cats." Collective nouns also work well, such as "a group of birds" instead of "birds."
💡 Tips: Use the command /describe to ask Midjourney to generate example prompts based on one or more images.
2. Prompt + Image

Midjourney allows you to manage an image based on another image. You can thus integrate an image into your prompts.
- Upload an image to Midjourney and send it in a message to the bot
- Launch the command /imagine
- Retrieve the URL of this image by dragging and dropping the image into your message
- Write a prompt after the URL
💡 Tips: You can adjust the importance level of the image relative to your prompt text using the "--iw" parameter. Add a ratio to the parameter to give more importance either to the image or to the text. Example: --iw 0.75, --iw 1, --iw 1.25, etc.
3. Image + Image

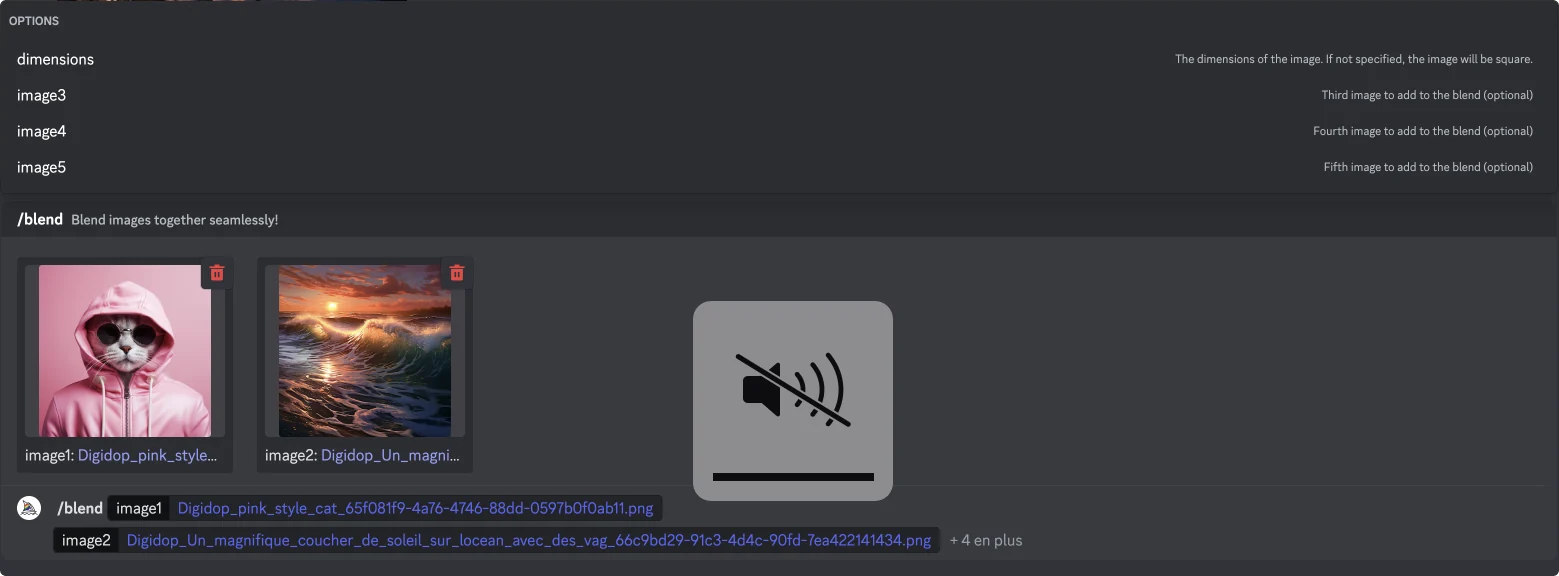
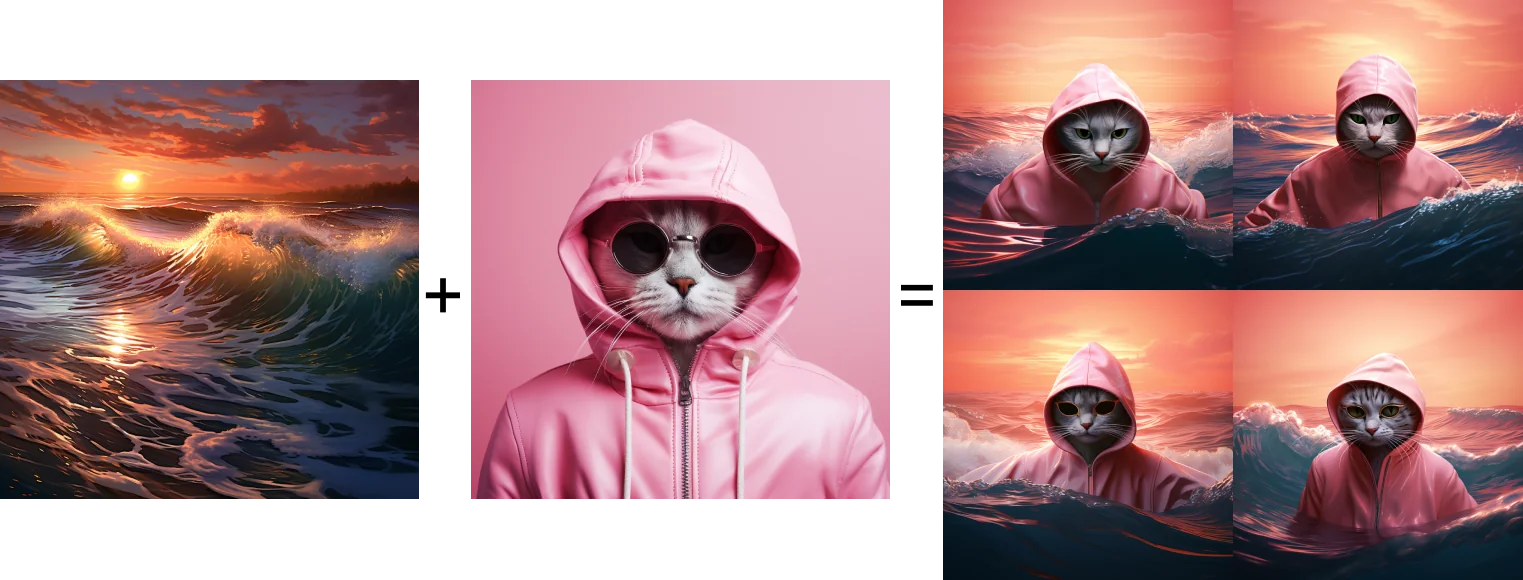
It is also possible to combine multiple images to merge them together. For this, you will need to use the /blend function instead of /imagine.
- Add the command /blend
- Upload at least 2 images
- Add more images if needed with the Image3, Image4, Image5 options
- The default ratio is (1:1), which means a square image. It is possible to adjust this ratio with the "dimension" option and the ratios (2:3) for portrait format or (3:2) for landscape format.

4. Using Discord
Direct Messages
.webp)
Newbies-104, Newbies-105, ... Stop generating your images from public chat channels, and open a private chat with the bot. This way, you can easily keep track of your image history and find them again.
- Click on "Member List" at the top right
- Click on MIDJOURNEY BOT
- Send a message from the dedicated field
- Find your conversation in your direct messages (All your direct messages are accessible from the "Direct Messages" button at the top left of your Discord interface.)
Image Grid

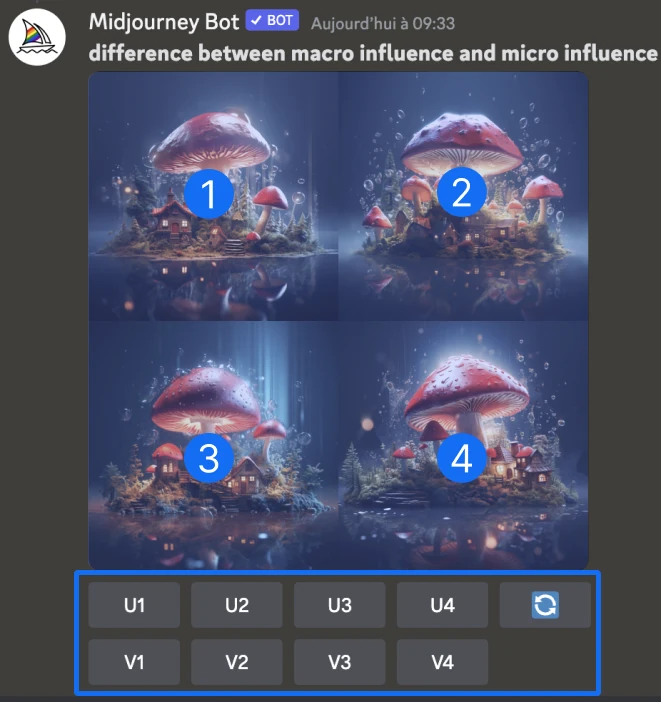
The /imagine command allows you to generate a grid of 4 image options. You can then choose the image that best matches your request using the buttons located below:
- U1 U2 U3 U4: The U buttons for "Upscale" allow you to select the image you like best to obtain a larger, higher-quality final version.
- V1 V2 V3 V4: The V buttons for "Variation" allow you to generate 4 new images based on one of the last 4 versions provided.
- Redo Icon: The Redo icon allows you to restart the generation of 4 new images using the original prompt.
Reactions with Emojis
Reacting with emojis on your images allows you to trigger certain actions. For example:
- ❌: Delete an image
- ✉️: Send a direct message with the image details
5. Command List
- /ask: Get an answer to a question.
- /blend: Easily merge two images.
- /daily_theme: Toggle notification pings for the #daily-theme channel update.
- /docs: Used in the official Midjourney Discord server to quickly generate a link to topics discussed in the Midjourney doc.
- /describe: Write four example prompts based on an uploaded image.
- /faq: Used in the official Midjourney Discord server to quickly generate a link to FAQs.
- /fast: Switch to fast mode.
- /help: Display useful basic information and tips on the Midjourney bot.
- /imagine: Generate an image using a prompt
- /info: Display information about your account and pending or ongoing works.
- /stealth: For Pro plan subscribers: switch to stealth mode
- /public: For Pro plan subscribers: switch to public mode
- /subscribe: Generate a personal link to a user's account page.
- /settings: View and adjust Midjourney Bot settings
- /prefer option: Create or manage a custom option.
- /prefer option list: View your current custom options.
- /prefer suffix: Specify a suffix to add at the end of each prompt.
- /show: Use an image from the job ID to regenerate the job in Discord.
- /relax: Switch to Relax mode.
- /remix: Activates Remix mode, allowing you to create variations of a base image via a new "Make Variations" button.
6. Use of Parameters

In Midjourney, parameters allow you to specify certain elements related to the image, such as styles, quality, ratio, etc. Parameters should always be added at the end of the prompts and begin with a double dash --.
- Ratios --ar: Allows you to change the ratio of an image that is by default 1:1. Example: --ar 16:9, --ar 7:4, --ar 4:3, etc.
- Chaos --c: Allows you to adjust the level of similarity among the 4 images generated in a grid. The lower the Chaos level (close to or equal to 0), the more similar the images in the same grid will be. The higher the Chaos level (for example, 80), the more different the images generated by the same prompt will be. Example: --c 0, --c 20, --c 30, etc.
- No --no: Allows you to exclude elements that you do not want to appear when creating the image. Example: --no fruit, --no blue, etc.
- Quality --q : Allows you to define the time spent generating an image, and thus the quality level of this image. The more time the AI spends, the higher the quality will be, but more Midjourney credits will be used. In some cases, you may want to reduce the quality level of the image. The maximum default time is 1. Example: --q .25, --q .5, --q .1
- Repeat --r: Allows you to repeat a command multiple times. For example, generate multiple grids of images at once. This parameter can be used with values between 2 and 10 for Standard plans and between 2 and 40 for Pro plans. Example: --repeat 2, --repeat 3, etc.
- Stop --stop: Allows you to stop the image generation before it is complete. The entire image generation process is based on 100, for example, you could use --stop 50 to stop the generation of the image at 50% of the process.
- Stylize --s: Allows you to adjust the artistic level of an image. On a scale from 0 to 1000, the --s parameter allows you to either get closer to the prompt (close to 0) or allow more artistic freedom (close to 1000). Example: --s 200, --s 750, etc.
- Style --style: Allows you to define a style parameter for the image grid generated by Midjourney. Example: --style original, --style expressive, --style scenic, --style cute, etc.
- Tile --tile: Generates images with "repetitive tiles." That is to say, the image will be a mosaic of a unique image that has been repeated several times. This is particularly useful for wallpaper patterns, textures, fabrics, etc.
- Version --v: Midjourney continues to evolve and release new versions of the product continuously. By default, you are always using the latest version of Midjourney, but it is possible to revert to previous versions using the --v parameter. Example: --v 5.2, --v 5.1, --v 5, etc.
- Video --video: Yes, you read that right, VIDEOS! In addition to images, Midjourney is capable of generating short videos in mp4 format thanks to the --video parameter.
- Weird --weird: This parameter allows you to explore a mode that is more ... dark, unexpected, or at least less usual in terms of aesthetics. The ratio ranges from 0 to 3000. 0 being the default value, and 3000 the most unexpected value. Example: --weird 0, --weird 250, --weird 500, --weird 1000.
💡 Tips: Commands can be combined with one another.

.png)
.webp)


.jpg)
