How to create a "scroll progress" bar on Webflow? | Tutorial

Tutorial
3 min
Published on Mar 20, 2023
Updated on
Yellow progress bar completing with Webflow logo.
Use AI to summarize this article
Key points

Discover in this tutorial how to create a horizontal progress indicator (progress bar) that advances as visitors scroll through your Webflow site.

Video Tutorial

The Tutorial in 4 Steps

1. Create and Design the Bar

  • Create a div block "wrapper"
  • Name it (e.g.: scroll-progress_wrapper)
  • Set the position of this div block to "Fixed or Sticky" and give it a sufficiently high z-index value so that it always remains in the foreground.
  • Create two child div blocks within the scroll-progress_wrapper div block
  • Assign them a name and a different color
  • Add an absolute position to these two divs so they overlap
  • Set both divs to have a width of 100% and the height you desire (3rem in the video tutorial)
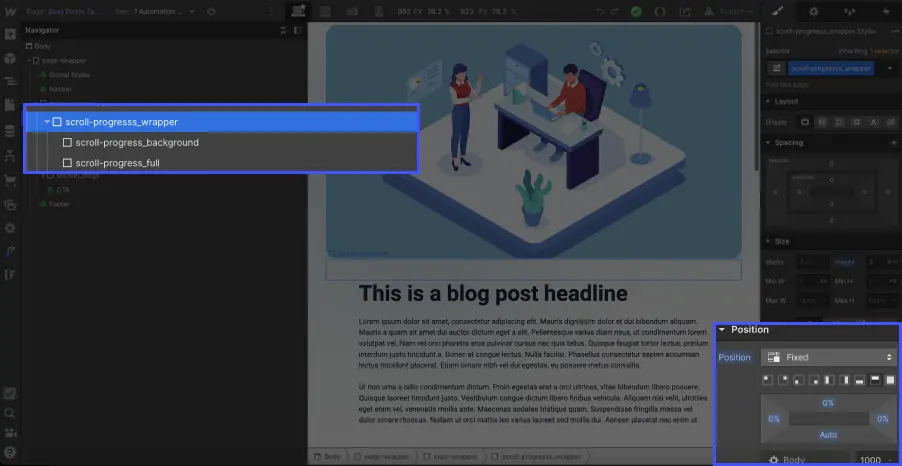
div block in Fixed position on Webflow

2. Add the Animation Trigger

Select the "body" element of your page and add a trigger ⚡️ to this element. In the "Page Trigger" menu of the Interactions panel, choose an animation of the type "While page is scrolling".
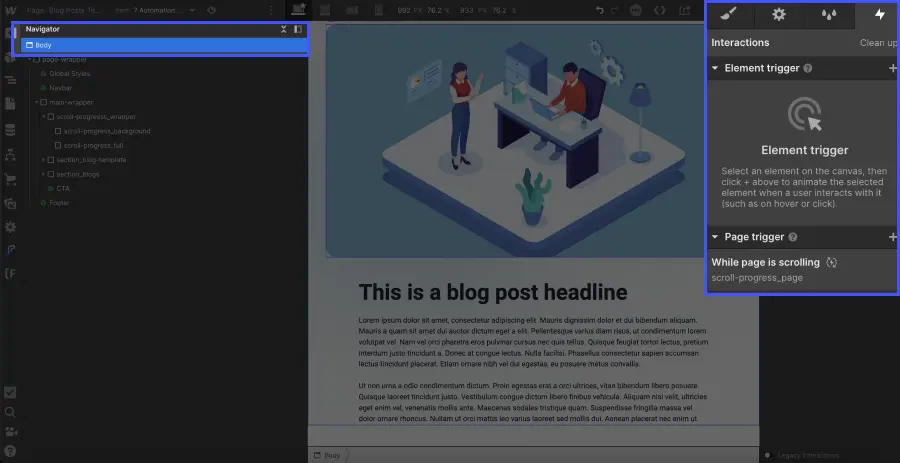
Webflow Animation 'while page is scrolling'

3. Create the "Scroll" Animation

  • Give it a name (for example, "scroll_progress_indicator").
  • Make sure your element (the progress bar) is selected, then click the + sign at 0% and choose "Scale" from the animation options dropdown.
  • Once scale is selected, adjust the x-axis position to 0. (⚠️ Be careful to only modify the x-axis value)
  • Click on your element at 100%, and still on Scale, change the x-axis value to 1.
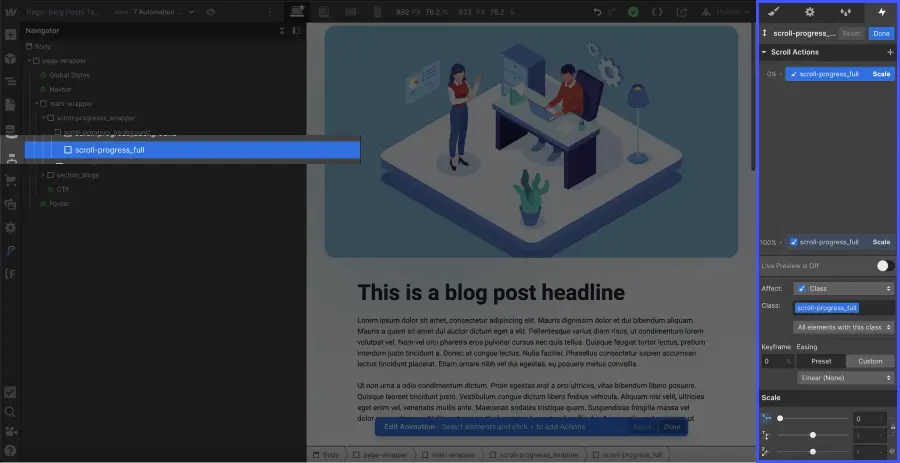
Webflow Animation Scale from 0 to 100%

4. Adjust the Origin of Your Horizontal Progress Bar

If your animation starts from the center outward, don’t worry, it’s "normal"! To change this, you need to set an origin that will determine the direction of your progress bar.

It's very simple:

  • Select your 'scroll-progress' div
  • Scroll down the style panel to Effects.
  • Click the More options (...) icon next to 2D and 3D Transformations.
  • Set the origin to the left (if you want the progress bar to advance from left to right)
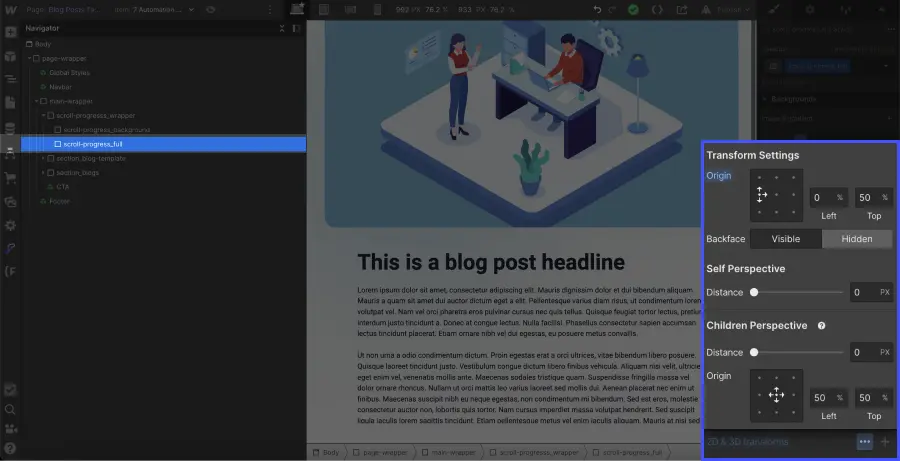
Transform origin settings panel on Webflow
Adjusting the origin of an element (2D & 3D Transforms)

Want to learn more about Webflow? Check out our tips to only disable horizontal scrolling for a Webflow section or:

👉 Explore the Digidop Academy

👉 Discover our YouTube channel

👉 Check out our blog with over 300 articles

Florian Bodelot
Florian Bodelot
Co-founder

Suggested articles

Promotional graphic for Webflow Conf 2026 featuring Lucas Clairet as a finalist for the Developer of the Year award. His black-and-white portrait is set against a vibrant abstract background with blue, orange, green, and pink textures, creating a bold, modern visual identity. The vertical Webflow Conf ’26 branding appears on the left, while his name and the title “Finalist – Developer of the Year” are displayed in a black panel.
News
Webflow

Lucas Clairet named Finalist for Webflow Awards 2026 – Developer of the Year

Lucas Clairet named Finalist for Webflow Awards 2026 – Developer of the Year
Overview of Webflow AEO combining AI recommendations, analytics, prompt tracking, and SEO optimizations within a single interface.
Documentation
Webflow

Webflow AEO: Answer Engine Optimization built directly into Webflow

Webflow AEO: Answer Engine Optimization built directly into Webflow
Website redesign brief document titled "Brief" on a dark blue background
Documentation

Brief, specifications and RFP: scoping your website redesign and choosing the right agency

Brief, specifications and RFP: scoping your website redesign and choosing the right agency
Every great website  
starts with a conversation
Abstract composition of black and gold metallic ribbons with elegant light reflections and smooth gradients. A premium background conveying luxury, modernity, and innovation.