WEBFLOW MEMBERSHIP BETA: IT'S TIMEEEEEEEEE!
It is now possible to create a member area, without any additional tools (👋 memberstack) on your Webflow websites. I've been using the BETA version of Webflow's member area for almost two weeks now.
Here’s a summary of my initial impressions, what I liked, and what you need to know!
- Official release date,
- Use cases for the member area,
- How to create your member area on Webflow?
1. Webflow member area: official release date
This was a feature that users of Webflow have been eagerly awaiting for several years, and the official release date is ....
Still unknown, hehe - but the beta is open!
Request beta access via this form
If you are selected, you will then see this new feature integrated into the designer interface of your Webflow project.

2. Why create a member area on your site?
2.1 Because it's a powerful acquisition lever!
There are plenty of good reasons to use this acquisition lever. Here are a few:
- Monetize content such as training/courses
- Create a private space for certain clients
- Create a lead magnet by blocking certain premium resources in exchange for data
- Foster an online community around a unique interface
These examples are just the tip of the iceberg when it comes to possibilities. I'm convinced that many no-code makers, with a bit of imagination, will create more levers on their websites with this new feature.
2.2 But beware of SEO limitations
Since part of your content is restricted, it's likely that restricted content will be treated separately in terms of SEO by Google. However, we will conduct our tests to learn more, and we’ll write a full article on the subject with all our findings!
3. How to create it on a Webflow site? (without memberstack)
Webflow allows you to easily create a reserved space, even if you're not an expert at the tool! Follow the guide, click a few buttons.
Simple and comprehensive tutorial
(1) Activate the member area for your project
⚠️ Important: just like Webflow's e-commerce feature, this action is irreversible. You will not be able to disable it afterwards. But if that is your choice... go for it!
→ Go to your Webflow project. In the vertical control bar (to the left) in your designer, click on the "Users" icon.
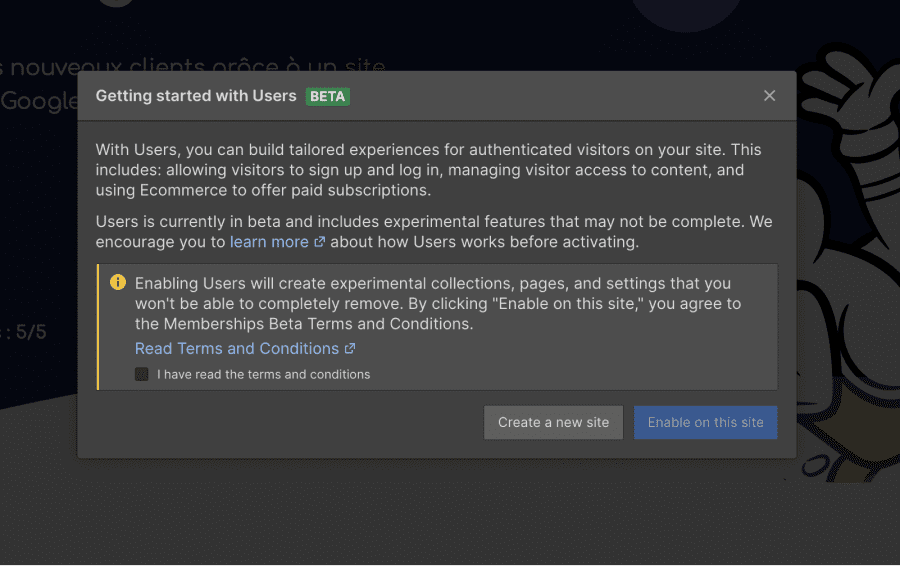
A notification window will pop up to remind you that this creation is final. Click okay, and your new membership area is created. Easy.
(2) Define Access Groups
This feature allows you to control which type of users will have access to which content. This is the foundation for starting to structure your member area.
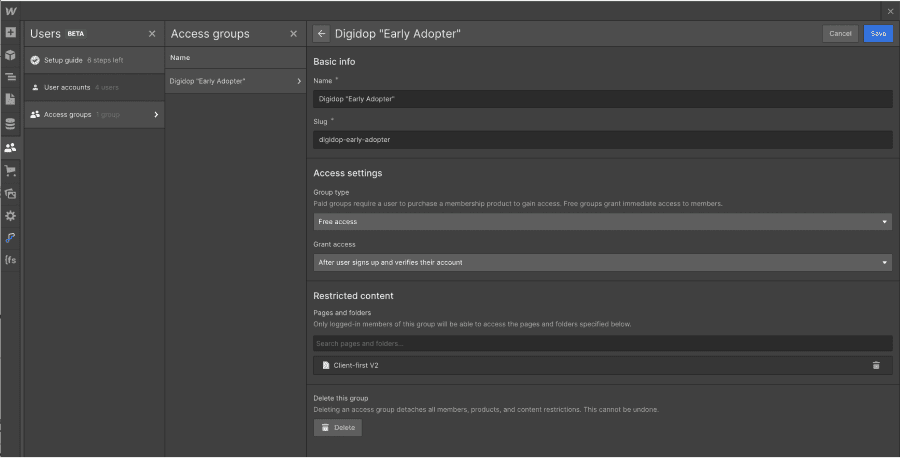
"Group type": will access be free or paid?
By default, access will be free because to add a payment gateway allowing you to create paid access on your website, you must first enable the e-commerce feature on your Webflow account.
Access "Grant Access": How will users gain access to your content?
To grant access to your private content, Webflow offers you two options:
- Automatically: when a user successfully signs up through your "login" page and confirms their email address. They will now be able to log in automatically to their account using this same email.
- Manually: allows you to manually invite people to access certain content (for example, after a pre-registration request, select and grant access to some applicants for a beta)
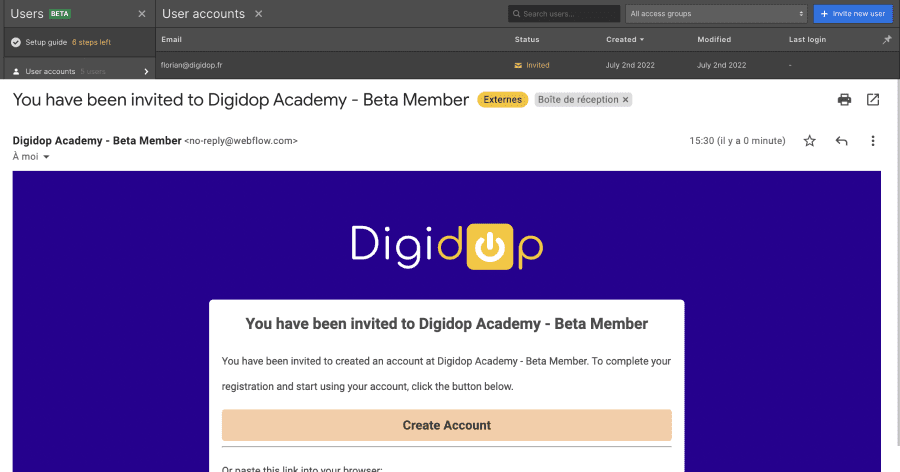
One of the biggest advantages of using automatic updates is the ability to free up time for you and your team to work on other tasks, but in some cases, the manual addition option allows you to select.
Restricted content: what content is blocked on your site?
With a simple click, you can precisely select the static, dynamic (CMS) pages, or even the folder of pages on which you wish to apply access restrictions.
Once all these fields are filled in, click on "Create."
There you go, you have now set up private access for your Webflow site. This element can be modified and it is also possible to delete it, just like an element in the CMS collections.
(3) Page restrictions
In the settings of your Webflow pages, you can now add specific access restrictions for each page in the "Access Control" tab;
- Public
- Specific members only
How to know which pages of my Webflow site have "members only" access?
On the "membership" pages, a small icon with a blue person appears in the bottom left corner.
.png)
(4) The default created pages (Users pages)
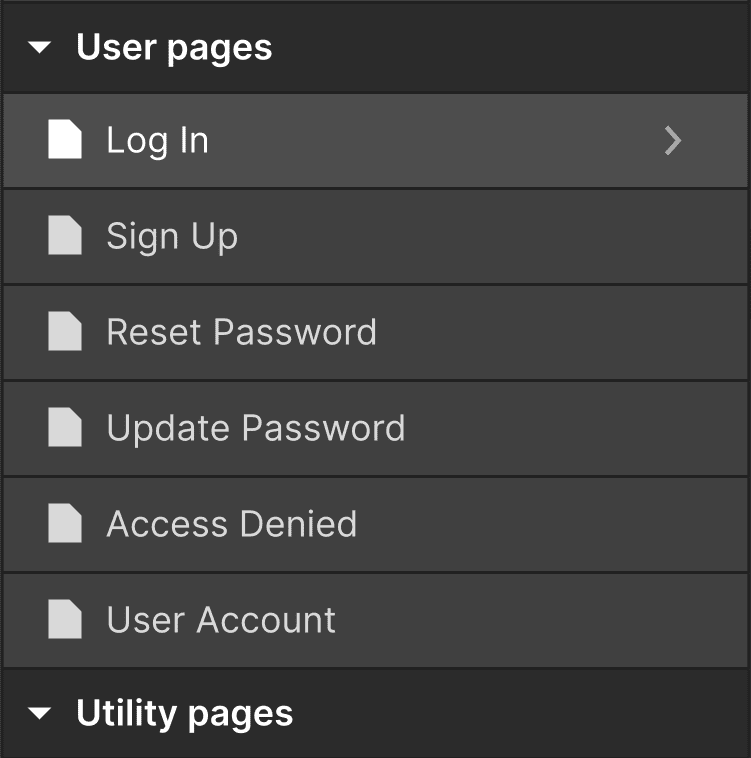
When you activate the member area on your project, Webflow will automatically create a series of pages:
- Log in
- Sign up
- Reset password
- Update password
- Access denied
- User account
These pages are similar to the "utility" pages found on your Webflow sites, like your 404 error page or your online shopping cart in the e-commerce extension. You can (and in my opinion should) fully customize their visual interfaces.
(5) Log in/Log out button
A log in/log out button! This is a new HTML element.
It is mandatory to make your members-only interface work.
To find it, go to the elements (A) and drag & drop the LOG IN/LOG OUT button directly onto your Webflow project interface. Once added to your site, you can customize its design and text.
(6) How to customize the sent emails?
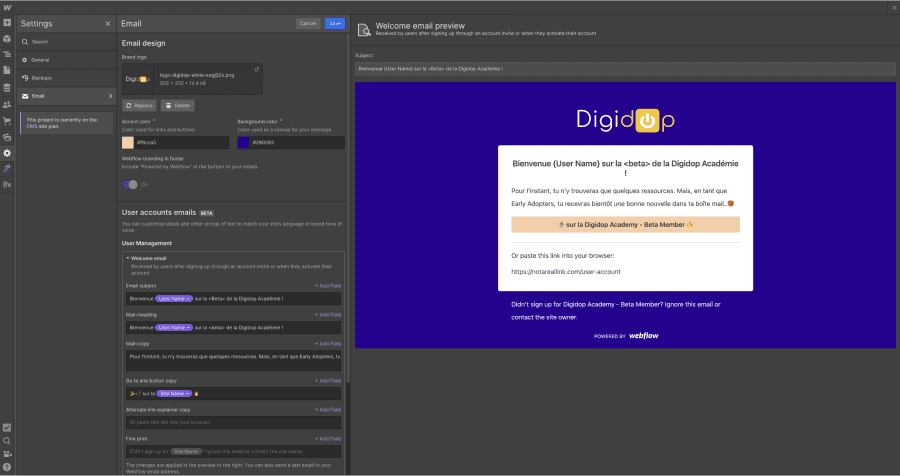
With the member area, several automated email templates are already integrated into the system by default (no plugins or additional tools required);
- welcome email
- password reset email
- password update email
- etc...
All of these fields are customizable with dynamic fields, supplied directly from your Webflow project. When a new member signs up, you can, for example, personalize their "welcome email" with their first name, last name, etc.
To access the template, go to the settings of your Webflow designer (⚠️ not the project, but accessible from the vertical left bar). Then click on the Email option, and you will find several possible customization options.
(7) Test your member area
Okkkkk. Does everything work fine? Let’s test!
Publish your site, and then test the proper integration of the member area live by simulating the creation of a sign-up with one of your email addresses.

____
From this next step, the described features are blocked if you do not have a Webflow e-commerce plan.
____
(8) Create a paid member area
- Activate the e-commerce feature of your site
- Add a new "product"
- Select the "membership" option from the product dropdown list
- Fill in the various descriptive fields
- Add payment parameters: subscription/one-time payment (Webflow works with Stripe)
- Set the price
- Validate your product and then return to the "Users" interface
- Repeat the steps for creating the "access group" and then change the access group parameter from "free access" to "paid access"
- Link this access to a product (the one you just created)
- Define the restrictions
- Click on create
Bonus: easily manage the tracking of your subscriptions from your CMS in the "subscriptions" tab.
A few extra tips...
- Make sure to keep a visible link to create a new account on your login interface.
- ⚠️ When someone cancels their subscription, the cancellation is immediate. They will see their access to private content cut off immediately. Make sure to explain this clearly.
Technical questions
How much does the member area cost?
According to Webflow, for now, the price "is yet to be determined."
But the first version, beta access is free.
Is there a limit on the number of users?
Currently, the member area is limited to 1000 members per project.
Can one log in using a Social account (Google, Facebook, etc.)?
A Single Sign-On (SSO) option is still under consideration within the product roadmap, so it is not yet possible. However, this should be monitored for future versions of the product.
Webflow Membership: our opinion
It is quite easy to grasp this new feature of Webflow since the back-office member area operates on the same principle as the CMS collections or the e-commerce of Webflow.
Whether you are a digital agency, a freelancer, or just a business, Membership 1.0 is more than sufficient to meet your development needs.
Combined with Make (an automation tool) and Airtable, you can already create robust workflows:
However, to fully utilize this feature, we are eagerly awaiting
- The release of "Logic" on Webflow. Logic is the automated Workflow System natively integrated into Webflow
- The development of the current e-commerce version.
To finally be in the...
The future
With the synergy between its member area, Logic, and its e-commerce feature, Webflow will offer its users enormous possibilities to create much more than just no-code websites. The possibilities for creation seem to soon become limitless.
P.S.: And finally, I wish good luck to WordPress and Memberstack in their continued innovation. Otherwise, next year, the numbers won’t be too pretty! Always all-in on the no-code Webflow tool, and I sleep soundly! Thank you, Webflow.


.jpg)
