Introduction
The web connects millions of individuals, each speaking their own language. For web creators, this presents an exciting challenge and an extraordinary opportunity. Webflow, with its brand new Localization feature, paves the way for creating tailored online experiences for a global audience.
In this comprehensive guide, we will dive deep into Webflow Localization, exploring every aspect with keen attention. From translating static content to adapting designs, localizing the CMS, and creating a language selector, no detail will be overlooked!
Get ready to master the art of Localization on Webflow and propel your site to new international horizons. Let’s get started!
Web Localization
Localization, a term increasingly present in the digital lexicon, plays a central role in creating bespoke online experiences for a global audience. Let’s delve into this concept.
What is localization?
Localization goes far beyond mere translation of text. It is a comprehensive adaptation of a website to meet the cultural, linguistic, and geographic specifics of its audience. It aims to provide a user experience that feels as natural and relevant in a given language as in the original language of the site.
But how does one localize a website? There are several options:
Option 1: Manual translation using subfolders
One approach is to create subfolders for each language and manually duplicate the base version in each folder for every language. Each language is treated as a distinct entity, with its own pages and content, completely independent from one another.
This method, while offering total control over how translations are managed and displayed on the site, is 100% manual and thus extremely time-consuming.
Pros:
- Free
- Total control
- No need for third-party tools
Cons:
- Extremely time-consuming
- Internal project organization becomes complicated
- Difficult to maintain
- Not scalable
Option 2: Automatic translation with a third-party tool
Another possibility for creating a multilingual website in Webflow is to use a third-party tool, such as Weglot.
These are the most popular choices today for translating a website. These solutions facilitate quick translation of a site, but they may present limitations in terms of customization and content adaptation.
Pros:
- Guided integration
- Centralized management
- Automatic translation
Cons:
- External to Webflow
- More complex integration for non-technical users
- Advanced features can be technically complex
Option 3: Webflow Localization – redefining localization standards
Finally, Webflow Localization represents a significant advancement in the field. Natively integrated into Webflow, this feature offers an ultra-comprehensive and integrated approach to localization, covering all aspects of the process, from translating static content to adapting designs and the CMS.
Pros:
- Native integration
- Centralized management within Webflow
- Semi-automatic translation
- Advanced customization of design and content
- Advanced features
Cons:
- Only usable in the Designer, more complex for non-technical users
The introduction of Webflow Localization opens up new possibilities for localizing websites on Webflow. In the upcoming sections, we will dive into the details of Webflow Localization and explore every facet to help you localize your Webflow sites from A to Z.
Part 1: How to Activate Webflow Localization on Your Site
To begin, this section will show you how to activate Localization on your Webflow site and how to add new languages to provide an even richer and more personalized user experience for your audience.
To activate Webflow Localization, head to your project’s Designer and follow these steps:
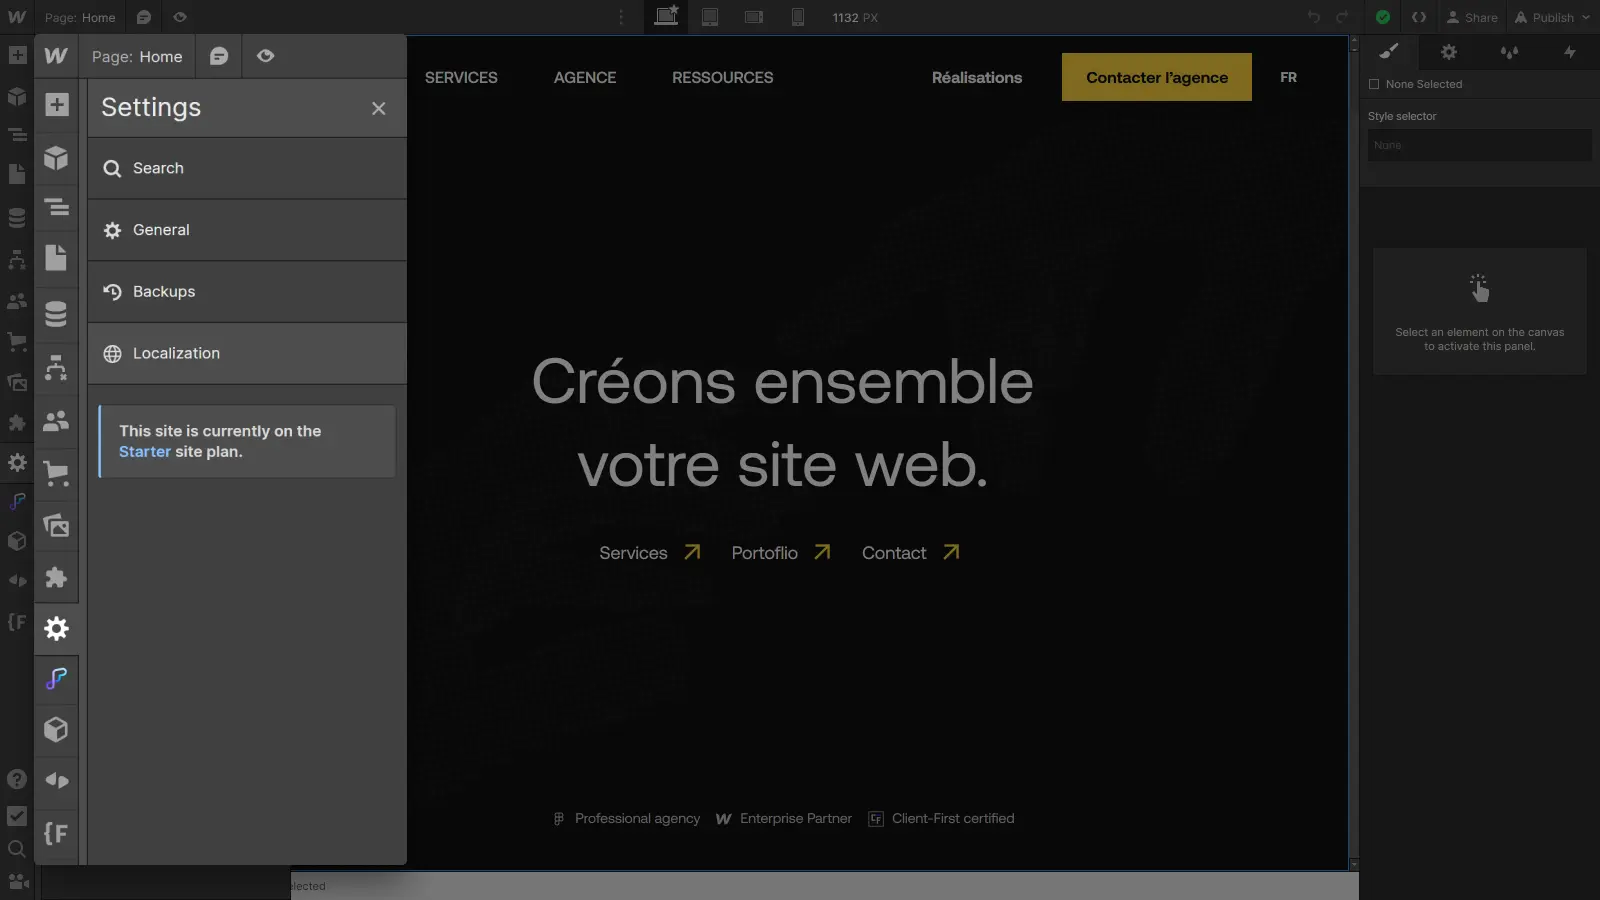
Step 1: Access Project Settings
In the Designer, click on the "Settings" icon in the left sidebar to access your project’s configuration options.
Step 2: Access Webflow Localization
In the project settings, you will now find a Localization tab. Click on this tab to open the feature settings, where you can define the default language (Locale) of your site and add the languages (Locales) you wish to translate the project into.
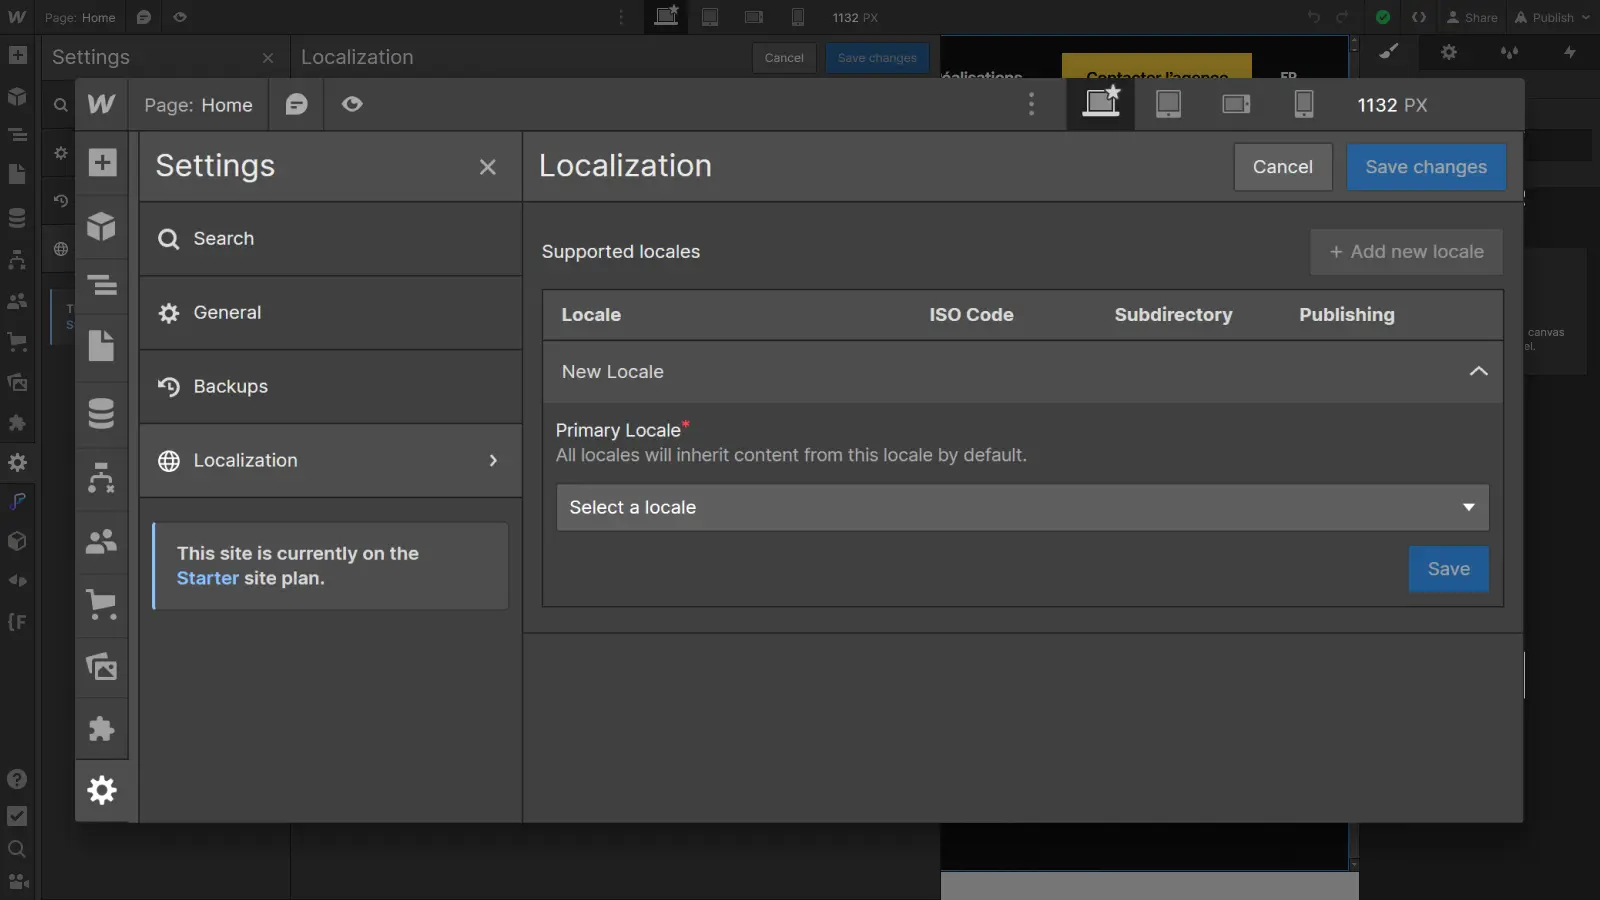
Step 3: Define Your Primary Language
To get started, select your default language (Primary Locale) from the dropdown list. This will be the language for the base version of the site, the version upon which the other languages (Locales) will be based.
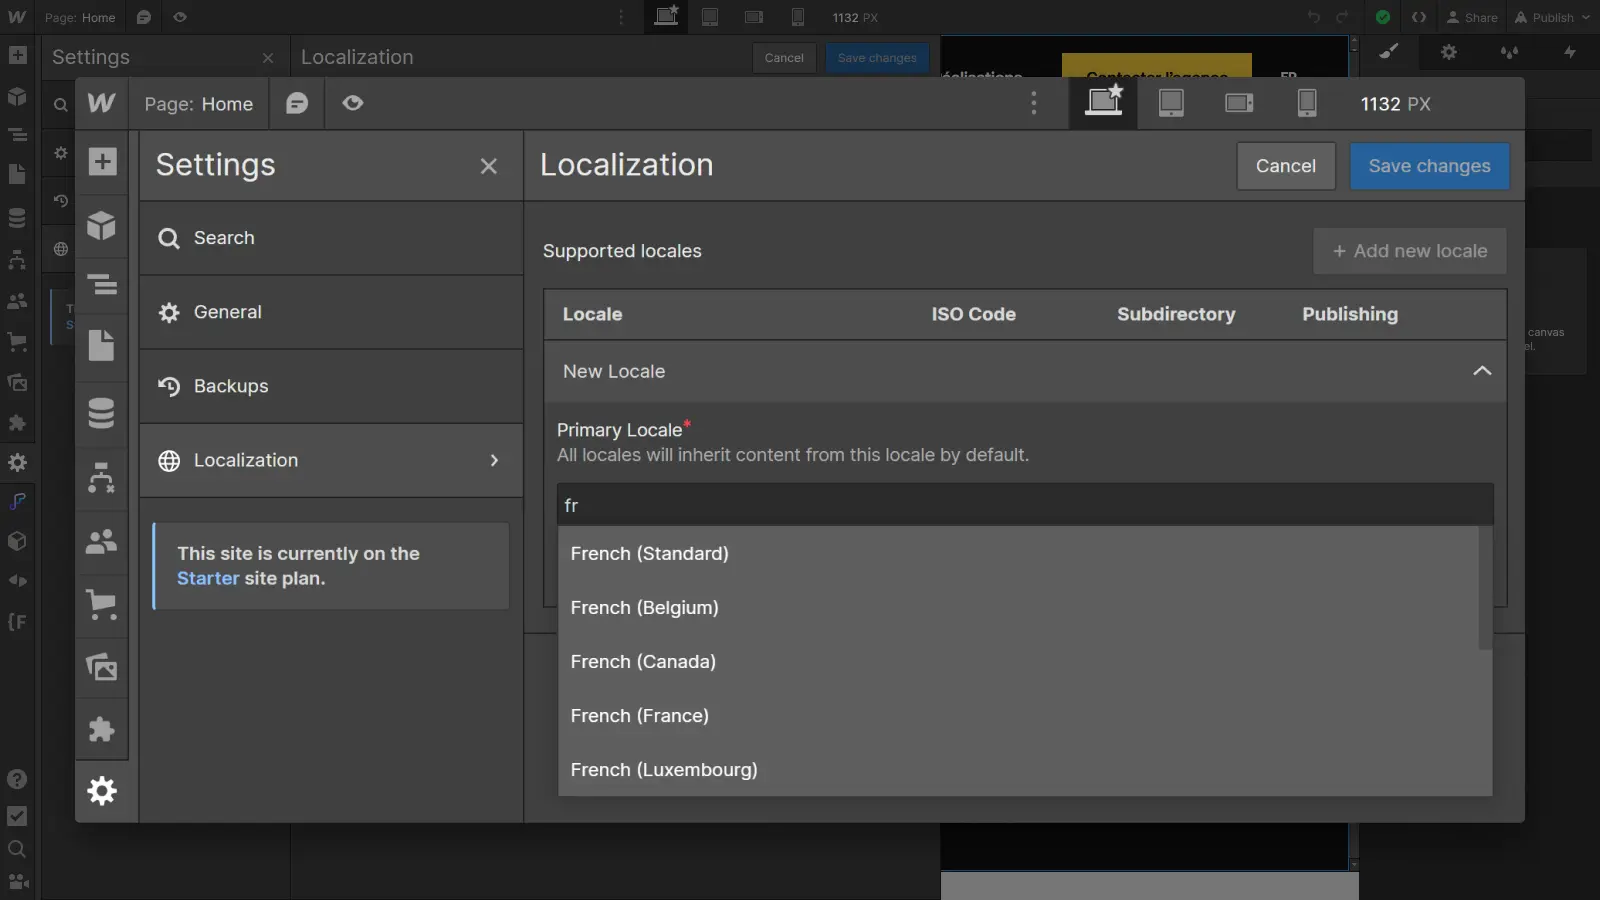
The localization system works in a cascading manner, similar to the breakpoint system. In Webflow, when you make changes to the largest screen size (desktop), those changes apply downward to smaller screen sizes (tablet and mobile). Conversely, if you make changes on a smaller screen size (mobile), those changes only apply to that size, without affecting the higher breakpoint.
The same principle applies to Localization: when you make changes to the base version, they cascade down to all versions. However, when you make changes to a secondary version, those changes apply only to that version.
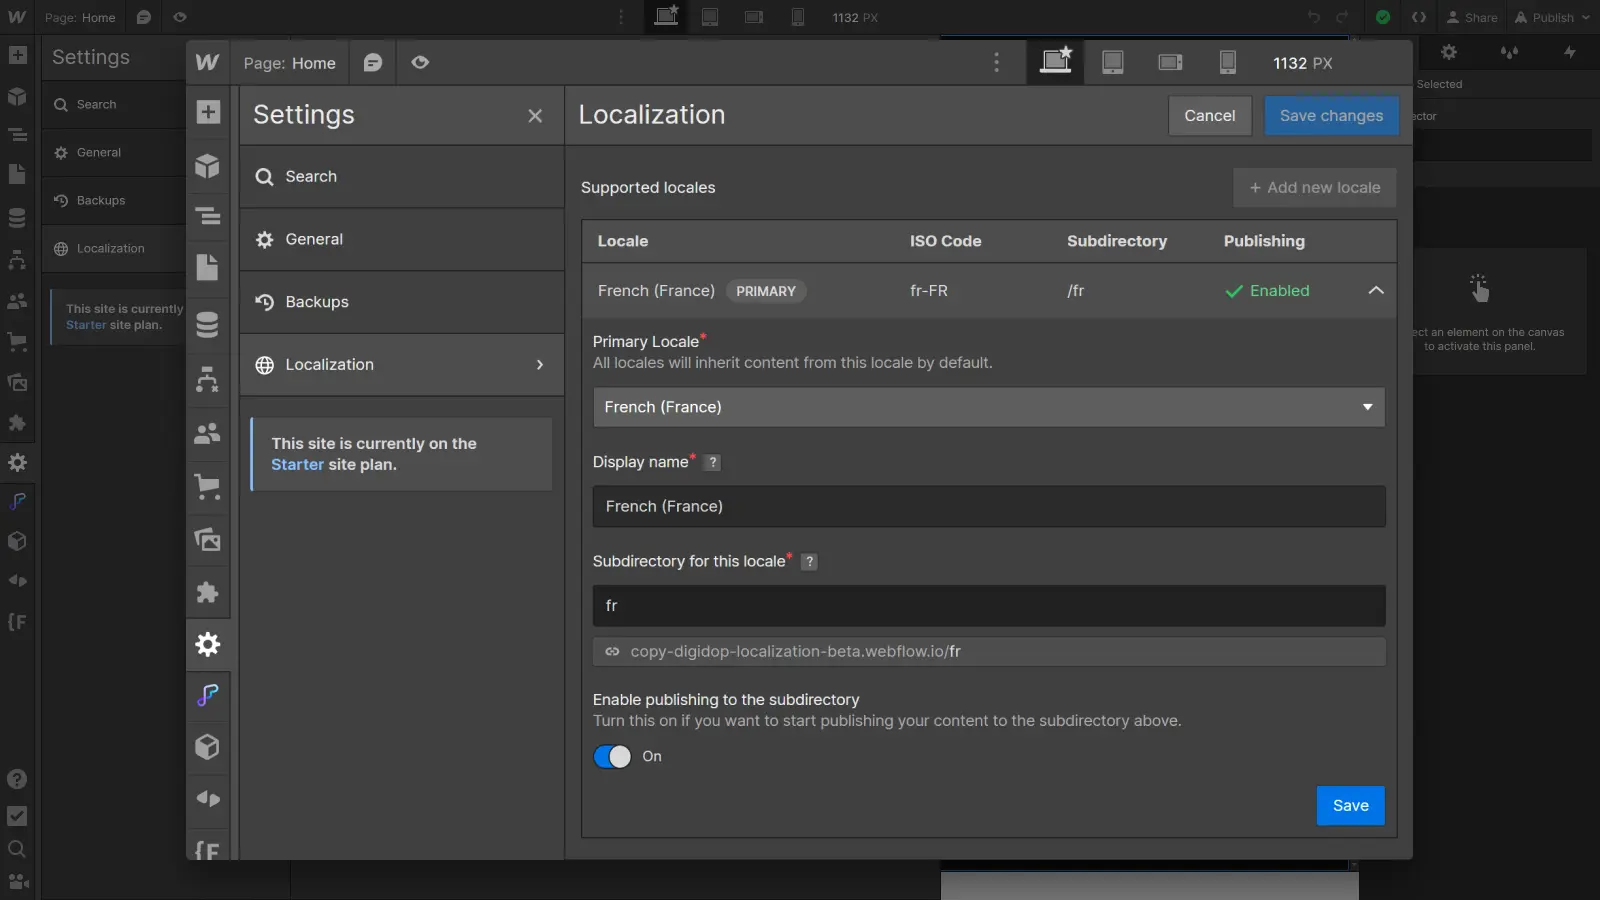
Step 4: Configure Your Primary Language
Once selected, configure the language options:
- Display name: This is the name that will be displayed for this language in the language selector (e.g., French).
- Subdirectory for this locale: This is the URL of the subfolder that will appear in the URL of each page of that version (e.g., digidop.fr/en/blog).
- Enable publishing for the subdirectory: This option determines whether the version will be published at the next site publishing, allowing you to take the time to fully localize each new version without risking it being published before it's finalized.
Step 5: Add New Languages
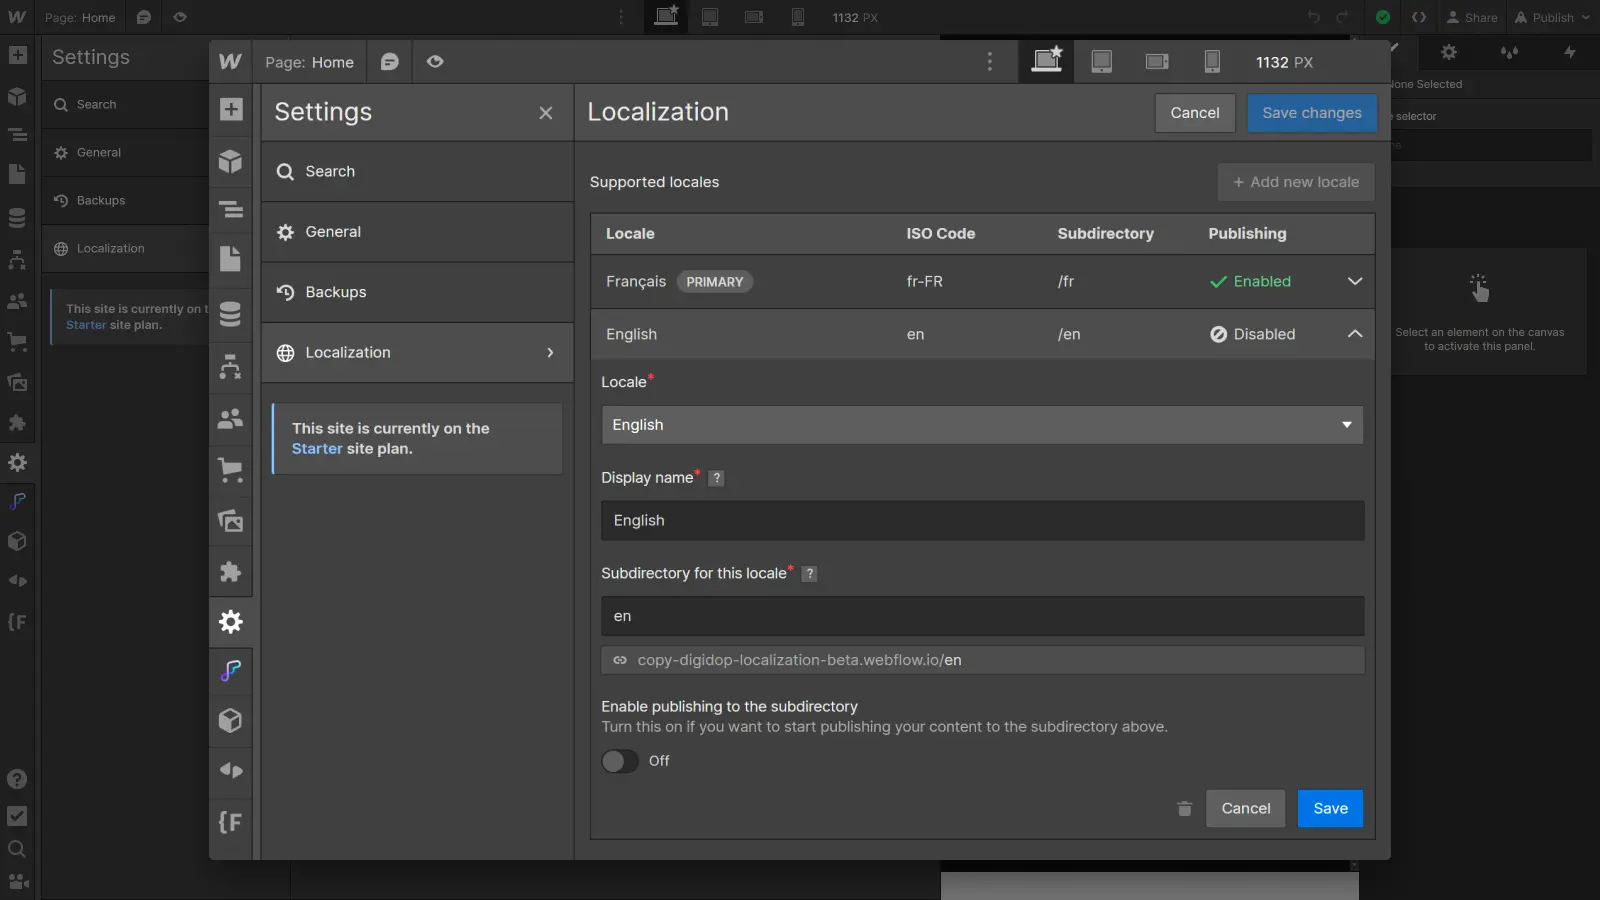
To add new languages, simply click on "Add new locale".
A list of supported languages will display: choose the new language you want to include on your site and configure its options as in the previous step. Repeat the process for any new languages you want to add.
Step 6: Save Changes
Finally, don't forget to save your localization settings by clicking "Save changes" at the top of the Localization panel.
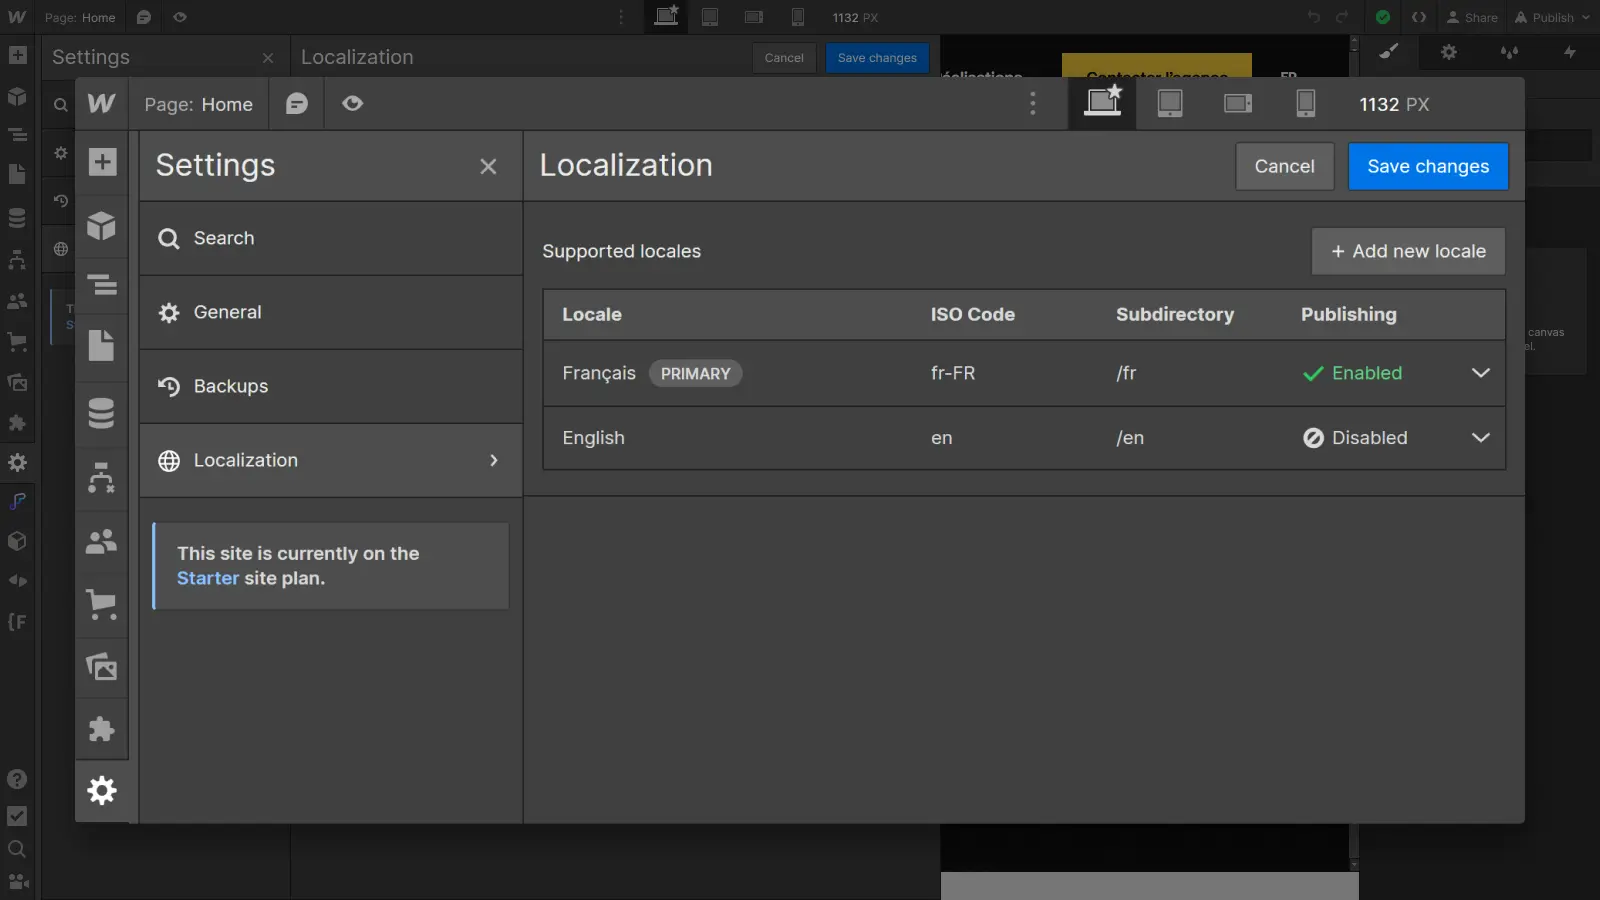
Congratulations! You have just activated Webflow Localization on your Webflow site.
The first step to localizing your Webflow site is now complete! The next step is to actually localize each version of your site, starting with translations. Let’s discover how to do this in the next section.
Part 2: How to Translate the Content of Your Site Pages
In this section, we will delve into the concrete aspects and show you how to translate and manage the various localized versions of your site.
Understanding the Interface and Functionality of Localization
First, to understand how localization functions in Webflow, it’s essential to grasp the principle of Locale view in the Designer and the inheritance principle of each language.
1. The Locale View
The Locale view allows you to see your Webflow site through the eyes of your international visitors, allowing you to:
- Select the language: Once you have activated localization and added languages to your project, you can use the Locale view to select and display in the Designer the language you wish to customize. Simply choose a language, and you will instantly enter that language mode.
- Specifically customize each language: When you switch to a specific locale language, all elements of your site are instantaneously displayed in that language. This includes text, images, buttons, etc. You can then make specific modifications to that language without affecting the other versions.
- Preview in real-time: The Locale view allows you to preview your site in real-time in the selected language, meaning you can see exactly what your visitors will see, making it easier to adjust the design and content to meet their expectations.
2. Default Content of Locales
Now that the principle of the Locale view is understood, it’s crucial to understand how the default content interacts with the local languages.
The localization system works in a cascading manner, similar to the breakpoint system. In Webflow, when you make changes to the largest screen size (desktop), those changes apply downward to smaller screen sizes (tablet and mobile). Conversely, if you make changes on a smaller screen size (mobile), those changes only apply to that size, without carrying over to the higher breakpoint.
The same applies to Localization: when you make changes to the base version of your site, they apply downward to all versions. Conversely, when you make changes to a specific version, those changes apply only to that version, without affecting the base version or the others.
For example, if you have a site in French (the primary language) and you add an English version, all non-customized elements in English will use the default French content (until you specifically modify them in the English version).
Navigating Between Different Language Versions
Once you have set up multiple languages, you can easily switch between them using the Locale view. Select the desired language from the language selector, and your site will be instantly displayed in that language.
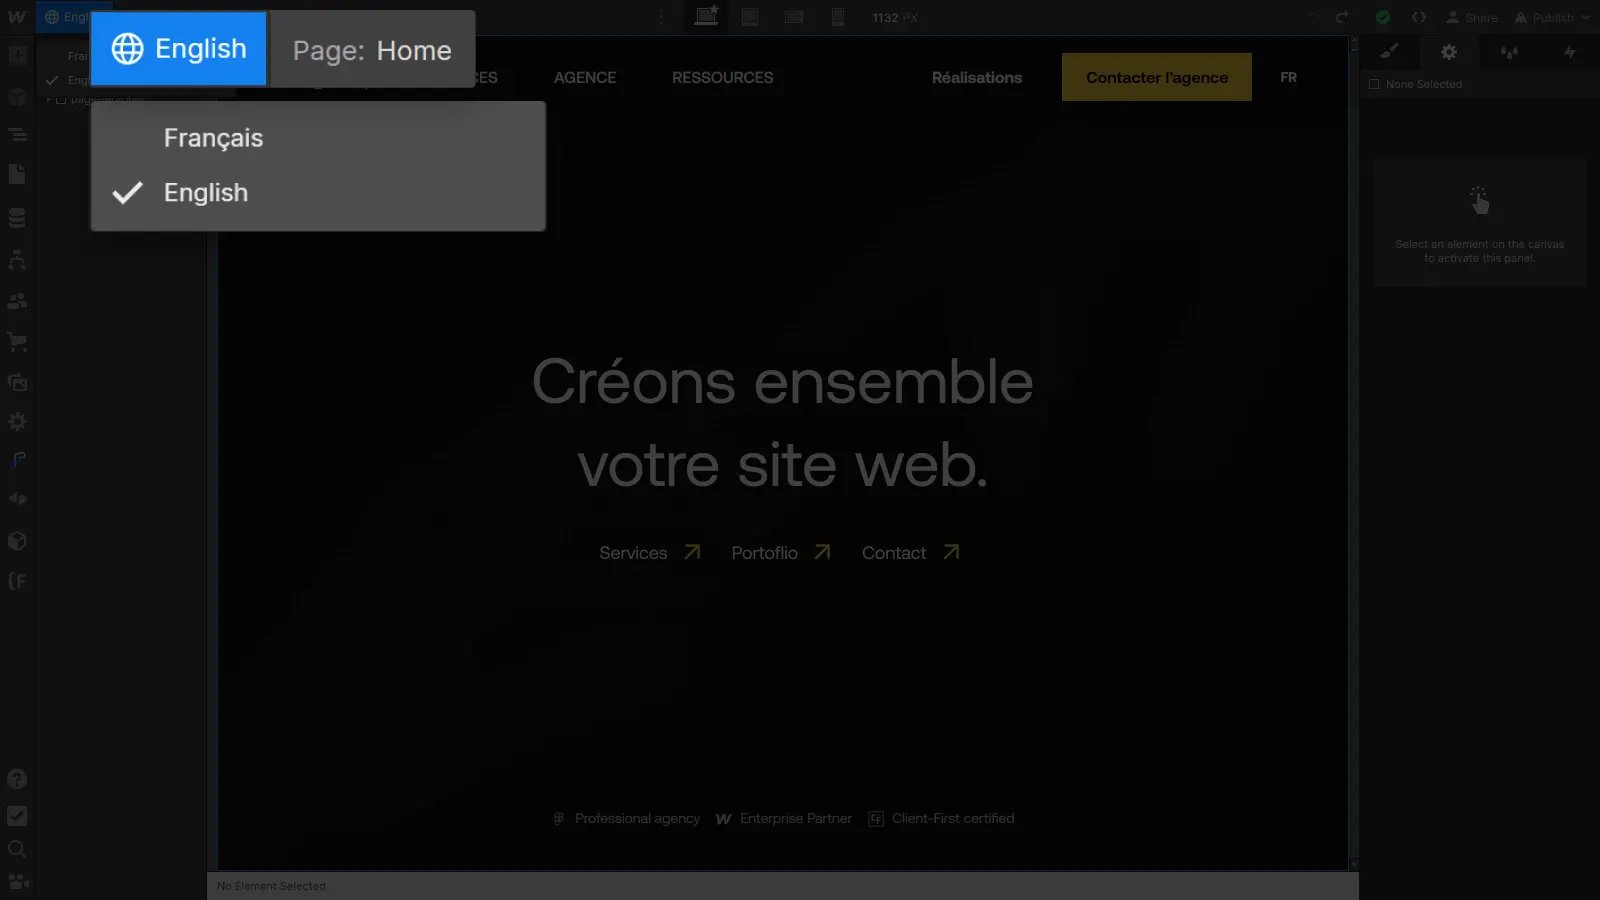
The Locale view then allows you to easily customize each language of your site, directly from the Webflow Designer. In the following sections of this article, we will explore in detail the customization of content, media, styles, and much more for each language you have activated.
How to Translate the Content of a Page
Now that you understand the Locale view, it’s time to dive into the localization (or translation) process of your site. Whether you want to customize text, images, styles, or other elements, the principle remains the same:
1. Select a Language Version
To begin, select a language version in the Locale view, for example, the English version. Once switched to that version, the changes made will only affect this specific version.
2. Translate
To translate the content of a page, you have two options:
- Translate each text manually,
- Translate the entire page (or a section of the page) at once.
To translate a text manually: simply select the text element and change its content as you would in any situation.

To translate the entire page at once: select the Body element in the navigator, then right-click the blue tag that appears in the Designer. You will now see an option “Translate to English” that will allow you to translate all content of the Body element. You can perform this operation on any element to translate a specific section.
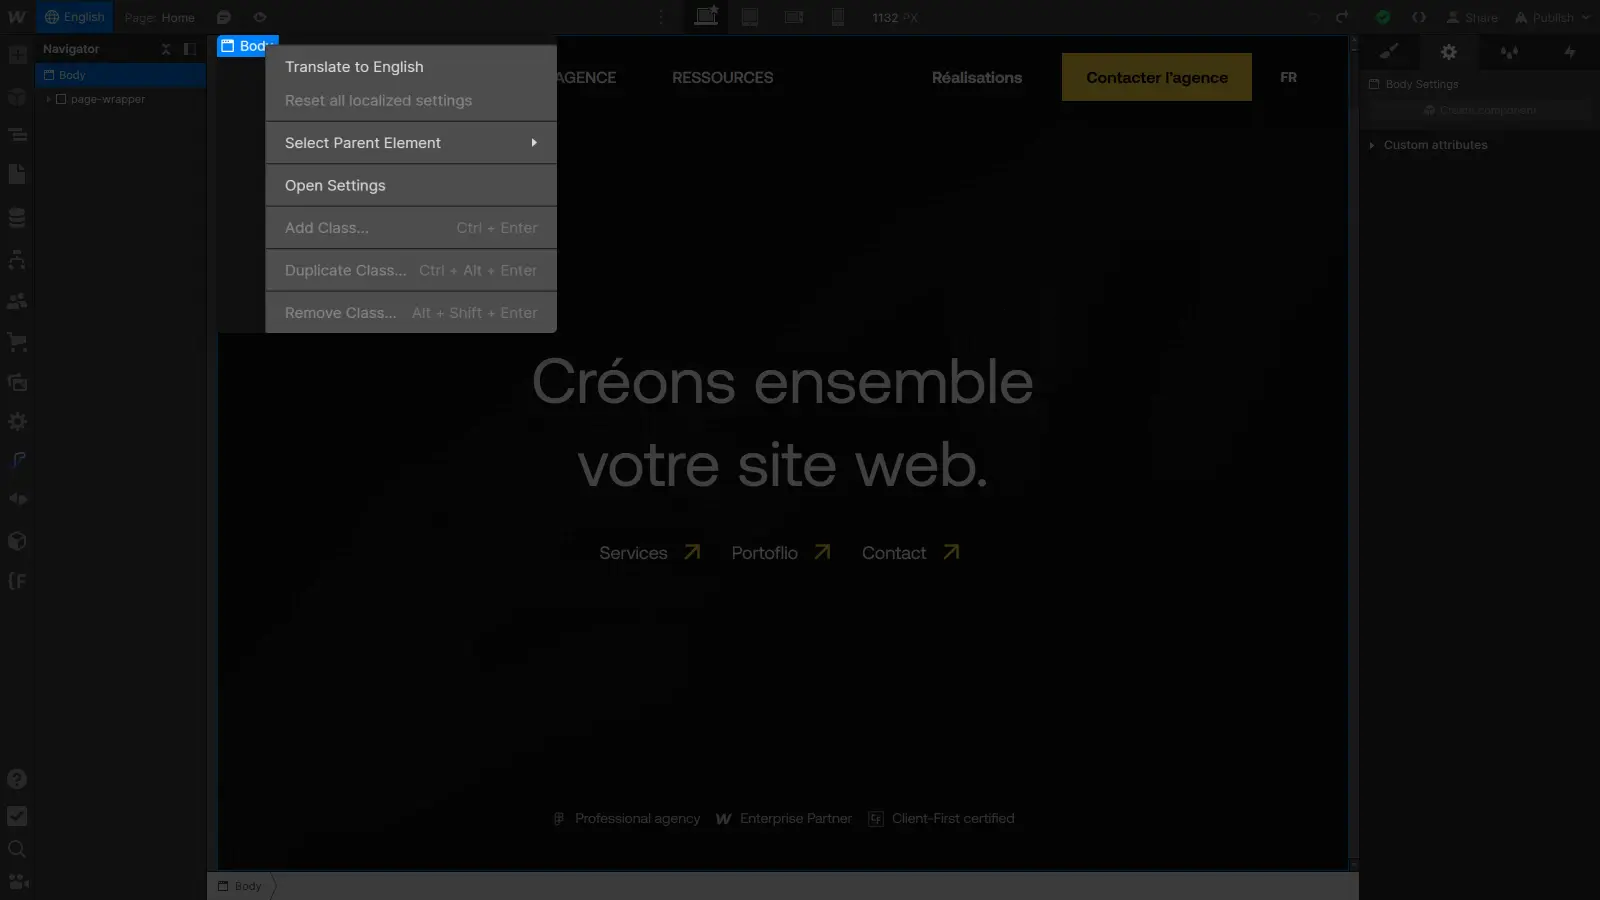
And there you have it, in just a few clicks, your page is translated into the selected version, and you can preview the design's rendering live from the Webflow Designer and make necessary adjustments just as quickly.
How to Translate a Component
Now that you know how to translate the content of your pages, let's take a moment to discuss components.
When you translate the entire page by selecting the Body element, the components on the page will only be translated under one condition: if you have created properties for them. For example, if you have a text property for a small call-to-action component.
In this case, the component will be translated as an instance specific to that page. That is to say, the same component present on other pages will not be translated.
To translate the global version of the component, and not create an instance, here’s how to do it:
- Select the relevant component.
- Right-click the blue tag that appears in the Designer.
- Click Translate.
If you prefer to translate it manually, you can simply open it and modify the content as you normally would.
How to Identify Localized Elements (and Reset Them)
Once you have started localizing your site’s content in various languages, it can be useful to know what has already been localized and, if necessary, how to reset an element to its base version. Here’s how you can do this:
Identify What Has Been Localized
To see which elements have been localized on a page, start by accessing the relevant version: make sure to be in the Locale view of the language you want to check.
Expand the Navigator. You will see all the elements present on the page. Elements that have been localized will have a globe icon next to them, allowing you to quickly identify which elements have been customized for the current language.
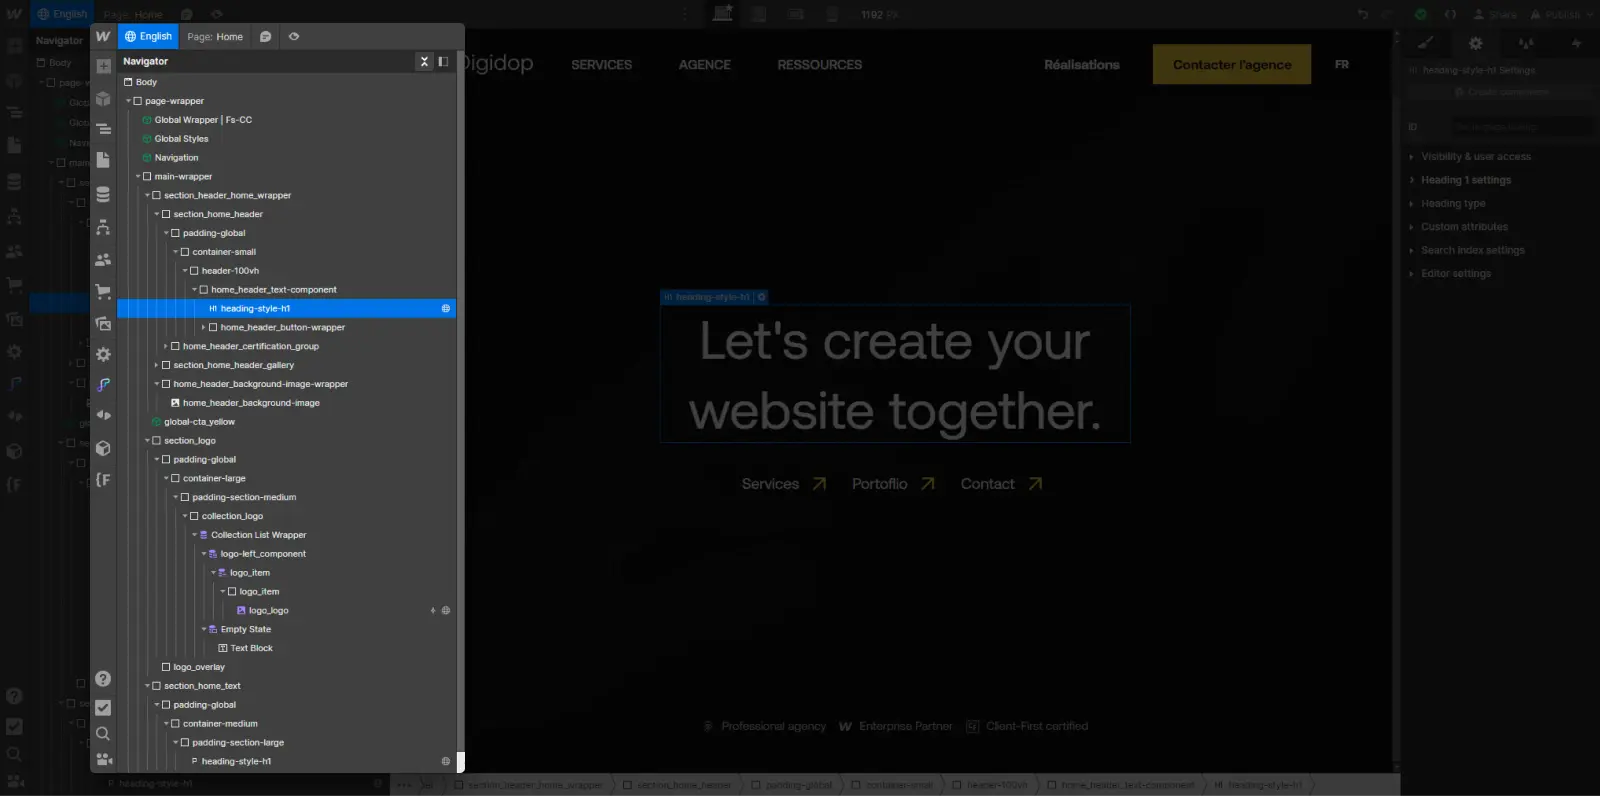
Reset Localized Elements
If you have localized an element and wish to reset it to inherit content from the primary language again, follow these steps:
- Select the element and right-click.
- Select "Reset all localized settings" to reset the element to its base version.
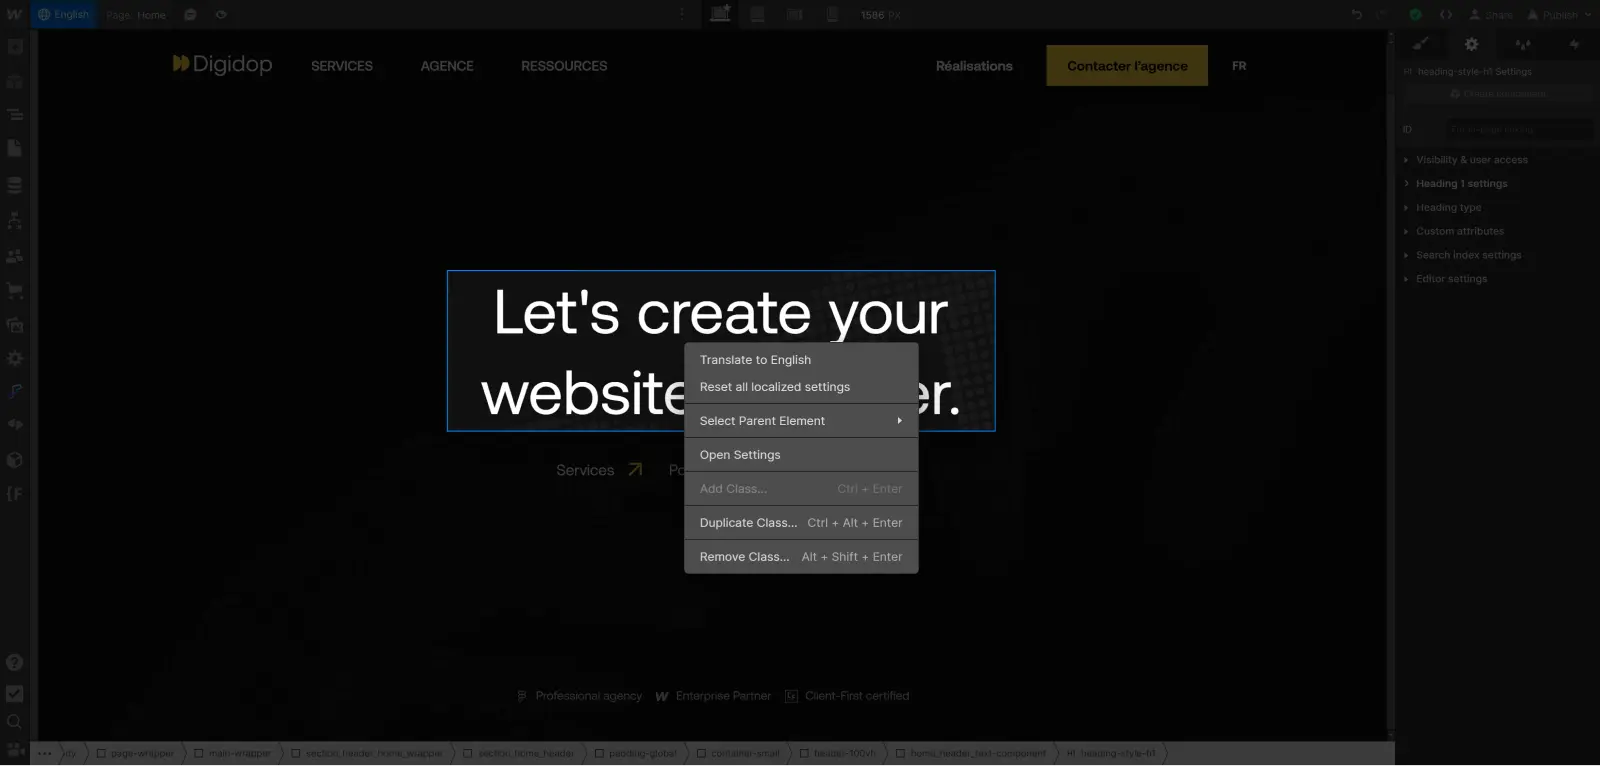
Note that resetting an element will only affect that element in the current language. Other languages will not be affected, and each language can have its own localized and reset elements as needed.
By following the steps described in this section, you now have the keys to effectively translate and manage the various localized versions of your Webflow site. But translating textual content is just the first, most obvious step. You can go even further and localize a host of things: translate the CMS, translate page settings, adapt designs, and more.
The next step is to best adapt the design of your pages to each language. Let’s discover how to do this in the next section.
How to Adapt the Design of Your Pages According to the Language
In the previous sections, we covered the basics of Webflow Localization, from activation to translating content. Now, we will explore how you can refine your design for each international audience. Whether you want to adjust styles, visual elements, or even assets such as images, Webflow has you covered.
Localizing Images Based on Language
When it comes to creating a localized website, every detail counts—including images and graphics that bring your site to life. They play a crucial role in helping your audience, wherever they are, feel connected to your content. The good news is that with Localization, you can customize these visual elements based on language, providing a truly tailored experience for each visitor. Here’s how you can do it:
1. Modify Images by Language
Suppose you have an image containing text. Instead of using the same text in each version of the site, you can adapt the image according to the user’s language:
- In the Designer, select the language you want to customize.
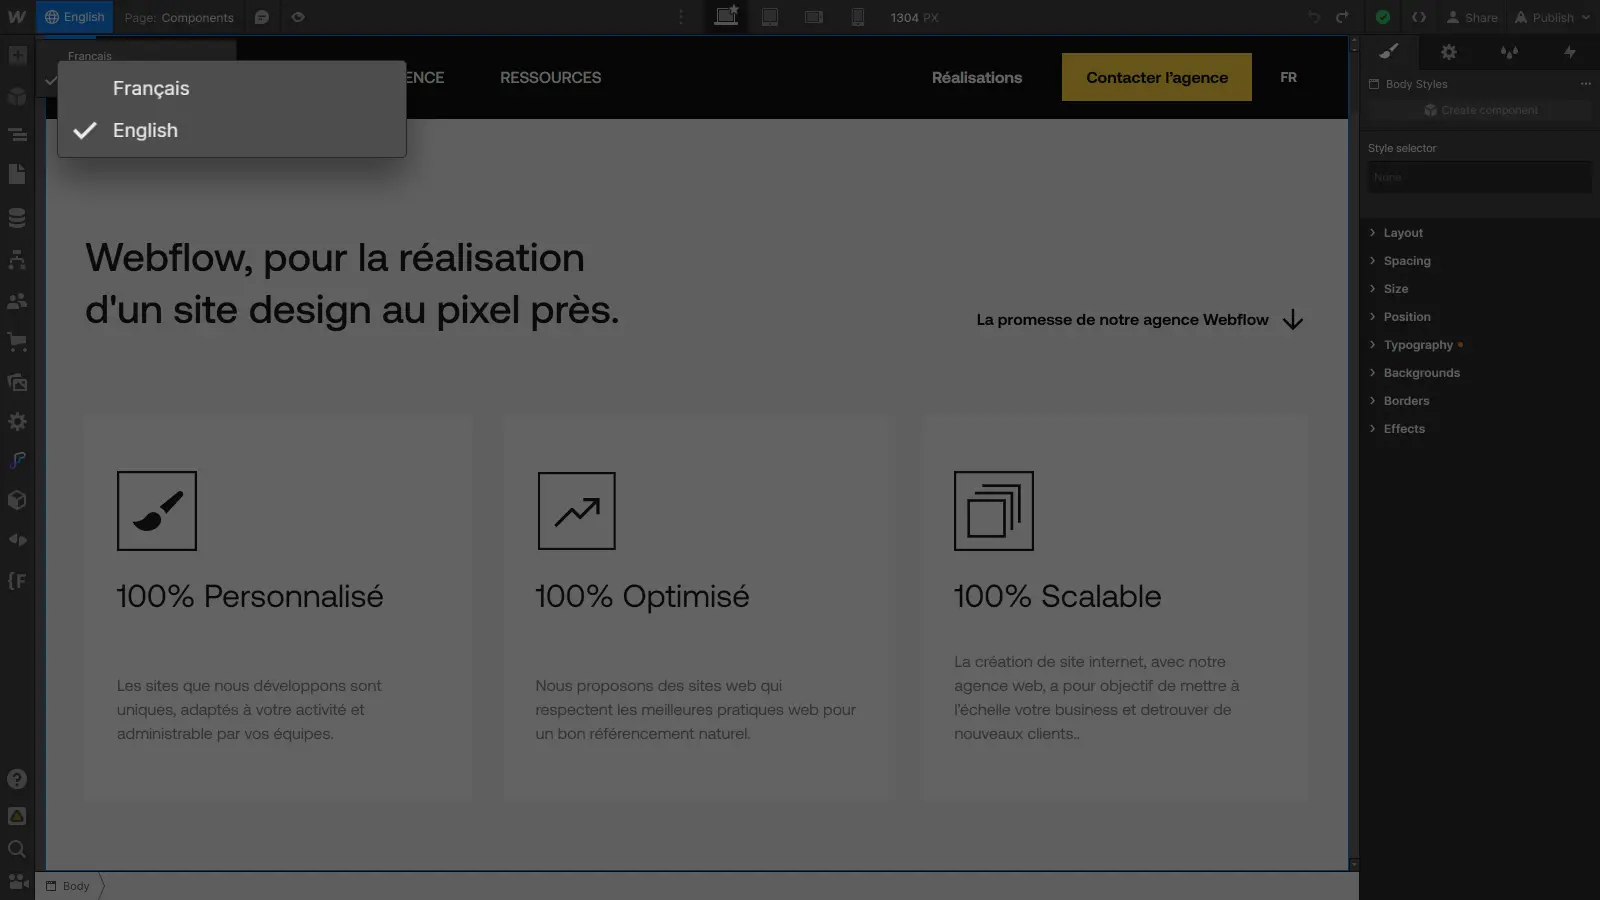
- Next, select the relevant image.
- In the right panel settings, modify the image as you would normally to select a new image that’s adapted to the chosen language.
The new image will now be specific to that language.

This is a simple and effective way to visually adapt your site to different languages.
2. Edit Image Alt Attribute
The Alt attribute is important for making your site accessible to everyone. To make it language-specific, follow these steps:
- In the Designer, choose the language you want to customize.
- Select the image whose Alt attribute you want to modify.
- In the right settings panel, translate the Alt attribute to match the chosen language.
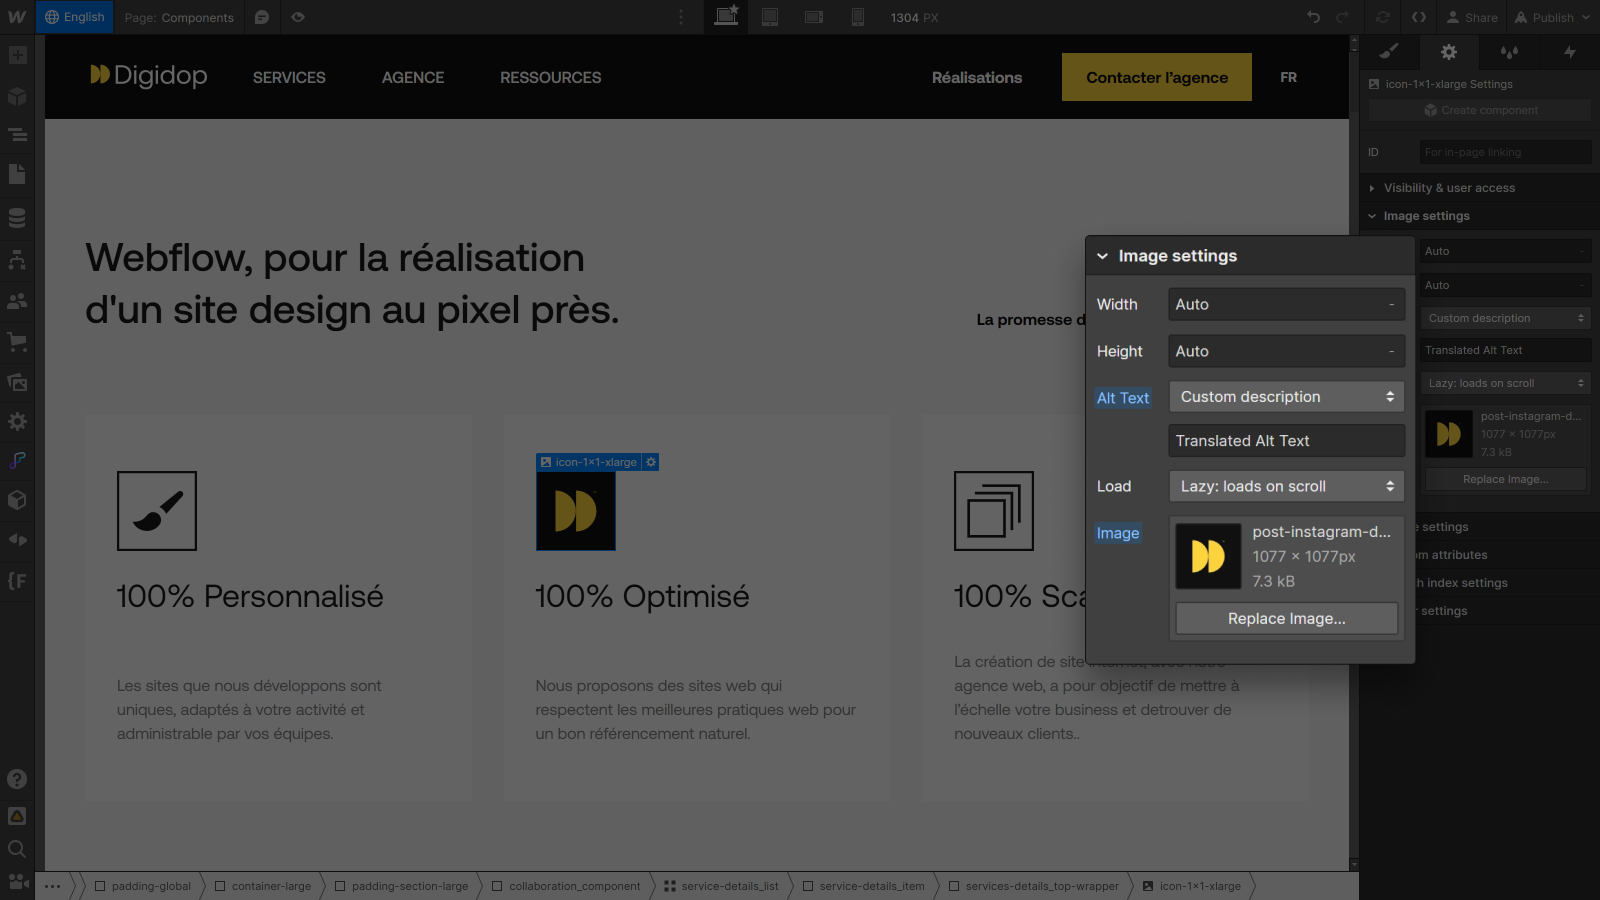
This way, when visitors use that language, they’ll get an appropriate description of the image, enhancing the user experience.
Following these simple steps allows you to customize your assets for each language, offering an experience truly tailored to your audience.
Hide or Show Elements by Language
Let’s dive deeper into customization by talking about element visibility. Imagine you have a website with a lot of content, but certain elements are relevant only to specific languages. Instead of showing everyone content that may not concern them, you can tailor the visibility of these elements by language:
- In the Designer, select the language you want to customize.
- Choose the element to hide, such as an image, button, or even an entire section.
- Open the element’s settings in the right panel.
- Choose the desired visibility: Visible or Hidden, based on the selected language.

By combining this technique with content translation and visual customization, you create a website that speaks your visitors’ language, shows them the right images, and provides information tailored to their language. This kind of personalization makes a real difference.
Adapting Styles for a Custom Design by Language
Now that you understand how to localize your visual assets and control element visibility by language, it’s time to dive into style localization.
Imagine you have a well-designed website, but each language has its own layout or size preferences. This is where customizing styles based on language comes in handy:
- Begin by selecting the language.

- Select the element you want to customize.
- Choose "Current Locale" in the class state list (if it’s not already selected).
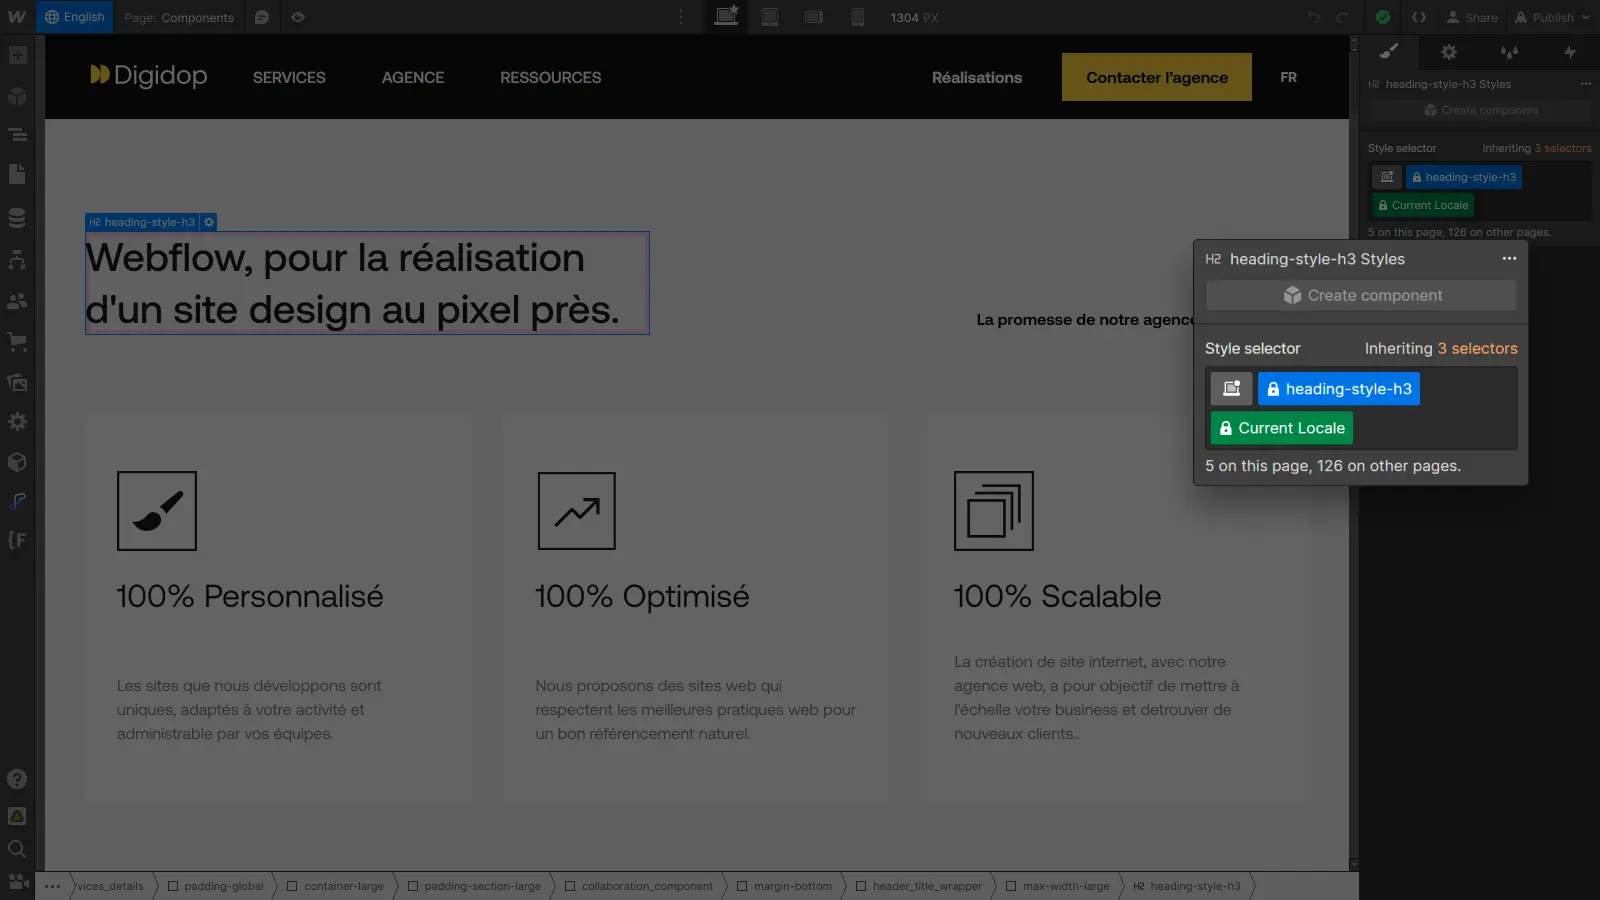
- Customize the element as you normally would.
You can adjust colors to match cultural preferences, change fonts for readability in a specific language, or even rearrange elements for a more suitable layout. These changes will be specific to the selected language, enabling you to create a unique experience for each language version of your site.
Translating SEO Options for a Multilingual, Search-Optimized Website
In previous sections, we covered how to activate Localization and translate your site’s content. Now, let’s explore an essential aspect of website localization: optimizing every language version for search engines.
Translating Page Options
To begin, let’s dive into translating page settings, titles, and meta-descriptions to boost your visibility in search engines. In a multilingual context, it’s essential to translate these elements so users can find you in their preferred language.
To localize your page settings, click the gear icon of the page you want to localize in the page list (P).
In the General tab
- Translate the page slug (URL) and, optionally, the page name.
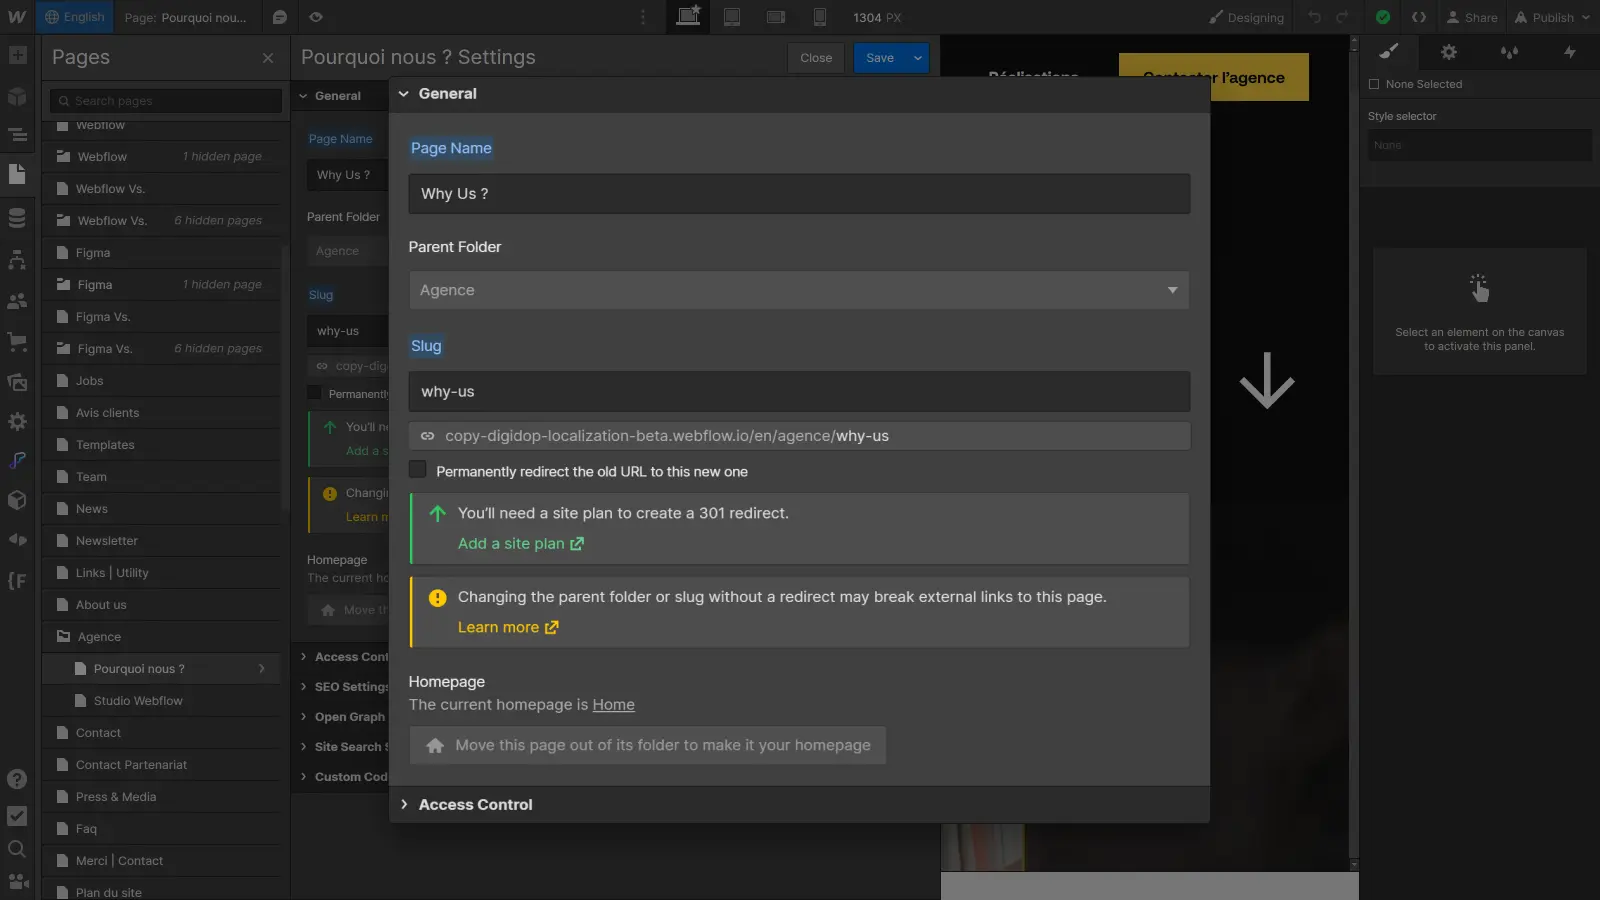
The field label will highlight blue once localized.
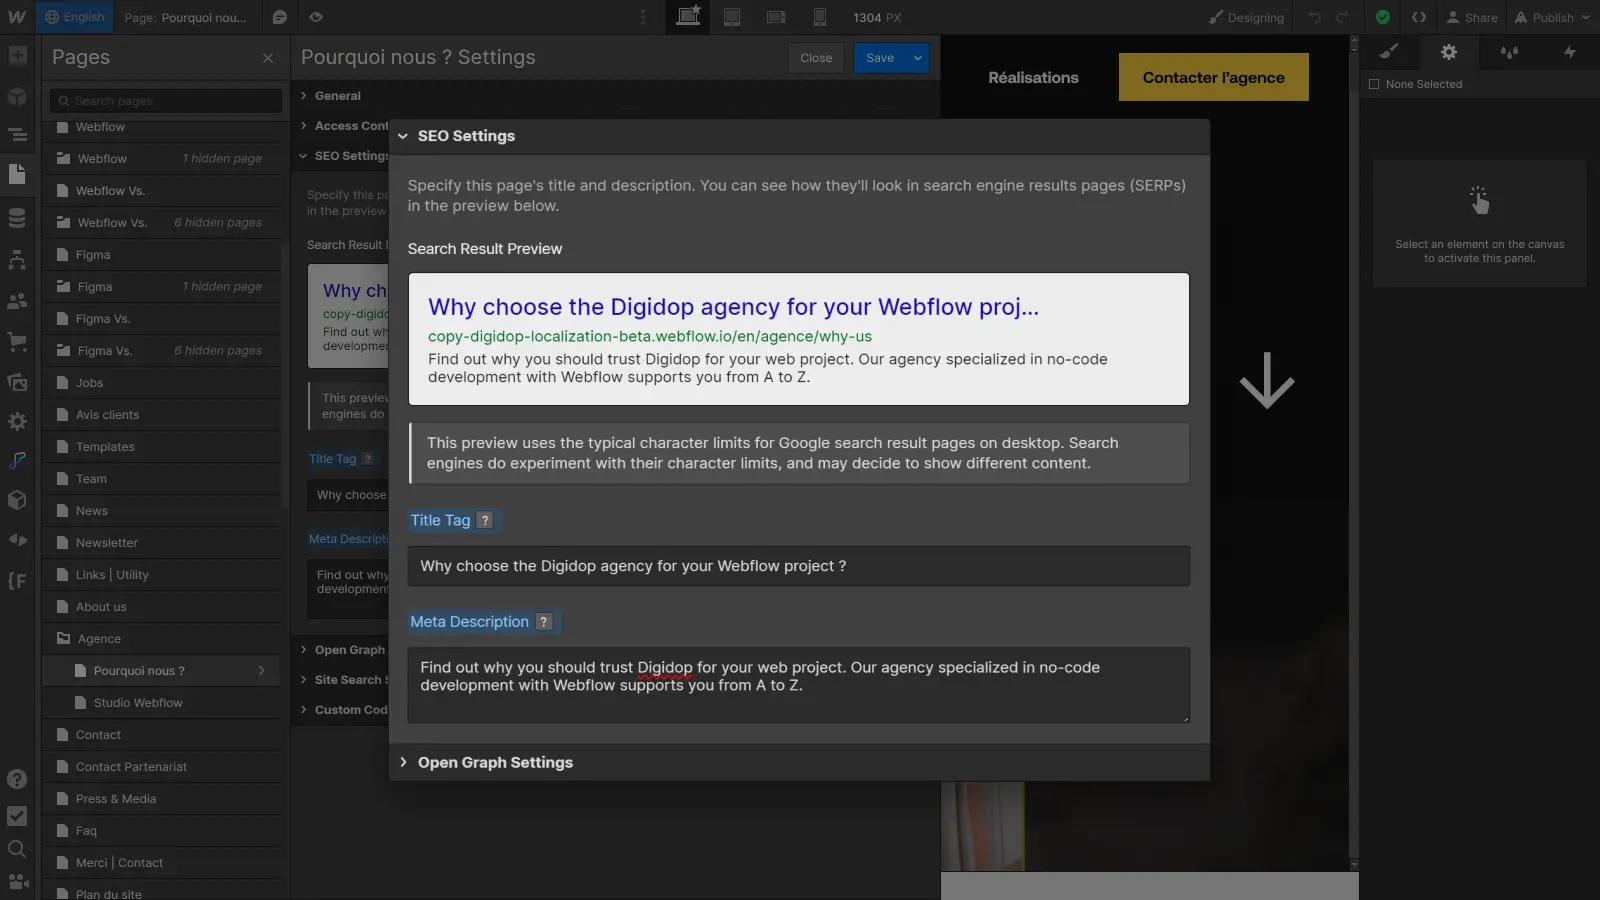
In the SEO settings tab
- Translate the title and meta-description.
In the Open Graph settings tab,
You can replace the Open Graph image with a localized version:
- Save and close the page settings.
- Open the assets panel (J), find the image you want to use for the localized Open Graph, and copy its URL.
- Click on the cogwheel icon above the image to open its parameters.
- Click on the link icon to copy the image URL.
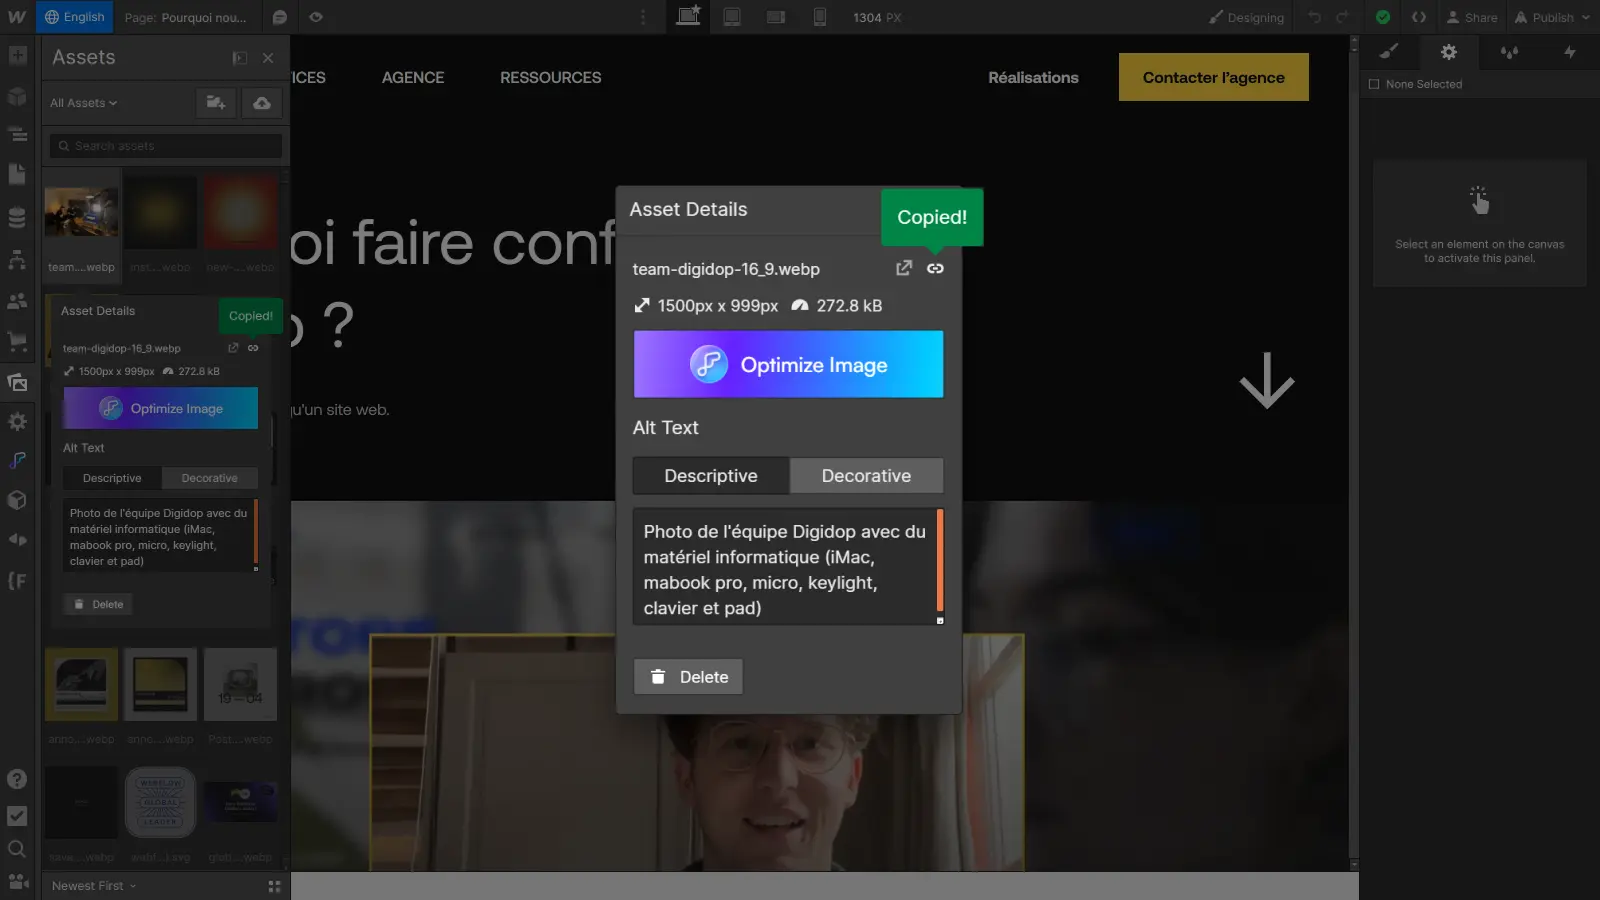
- Return to your page settings and paste the URL in the Open Graph field.
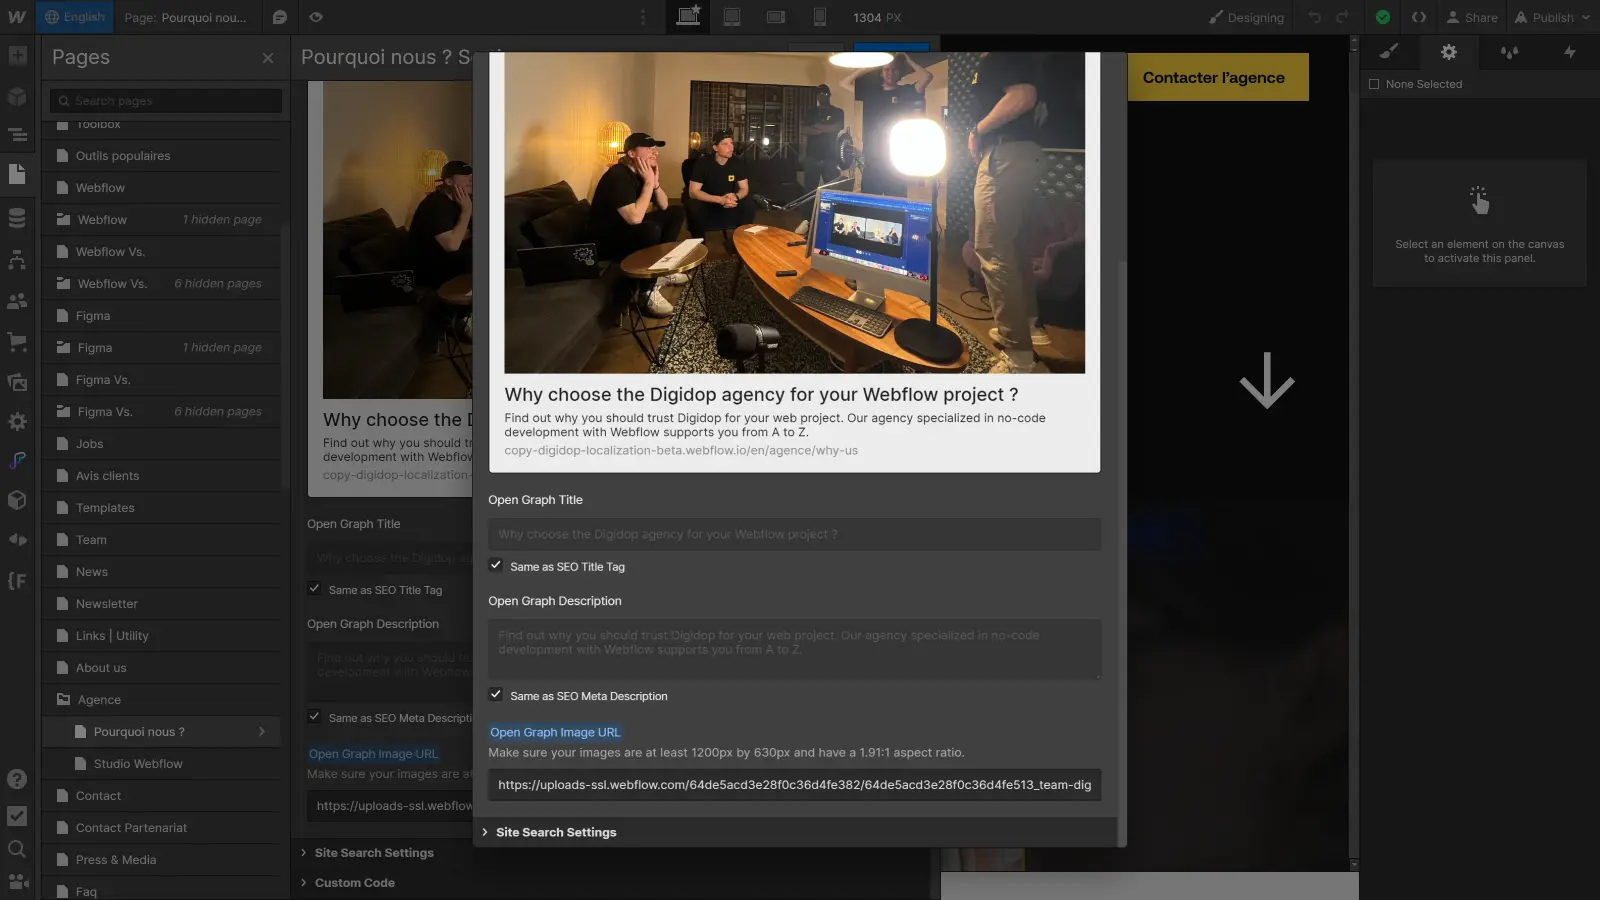
- Finally, don't forget to save and close the page settings.
Your page settings are now localized and adapted to the target language. Simply repeat this process for each page and language. Be sure to use relevant and engaging terms for titles and meta-descriptions, and research appropriate keywords for each language to match user searches.
Congratulations, you now know how to make your multilingual site visible on search engines in all languages. In the next part, we'll look at another key question in the localization process: how do you localize your CMS?
How to Localize Your CMS in Webflow
In the previous sections, we explored translating static content, adapting design, and localizing SEO data. Now, let’s delve into what is often the heart of your site: the CMS.
Each version retains the same structure for consistency, while items can be customized for specific languages. In the next section, we’ll see how to integrate localized collections on your Webflow pages.
General Operation of CMS Localization
CMS Localization in Webflow works similarly to static content localization, but with some specificities.
Unlike static content, where a single page can be translated into multiple languages, the CMS introduces a key difference. Collections and their fields are shared across all languages, ensuring structural consistency. However, the distinction lies in the items within these collections.
Each language has its own distinct items. Think of each item as an independent instance of your collection, tailored to a specific language. This allows you to customize fields for each item to meet the unique needs of each linguistic version of your site.
This approach provides fine-tuned content management per language, offering both global uniformity (thanks to shared collections) and the flexibility to address language-specific nuances (through distinct items for each language).
In the next section, we delve deeper into collection localization to understand how this feature is deployed in practice.
Localizing Collections
When it comes to localizing collections in Webflow, the process is straightforward.
The slug (URL) of a collection can be localized to suit each language. Instead of a universal URL, you can have localized slugs, making navigation easier for users in their preferred language. For example, translating “témoignages” to “testimonials” for the English version.
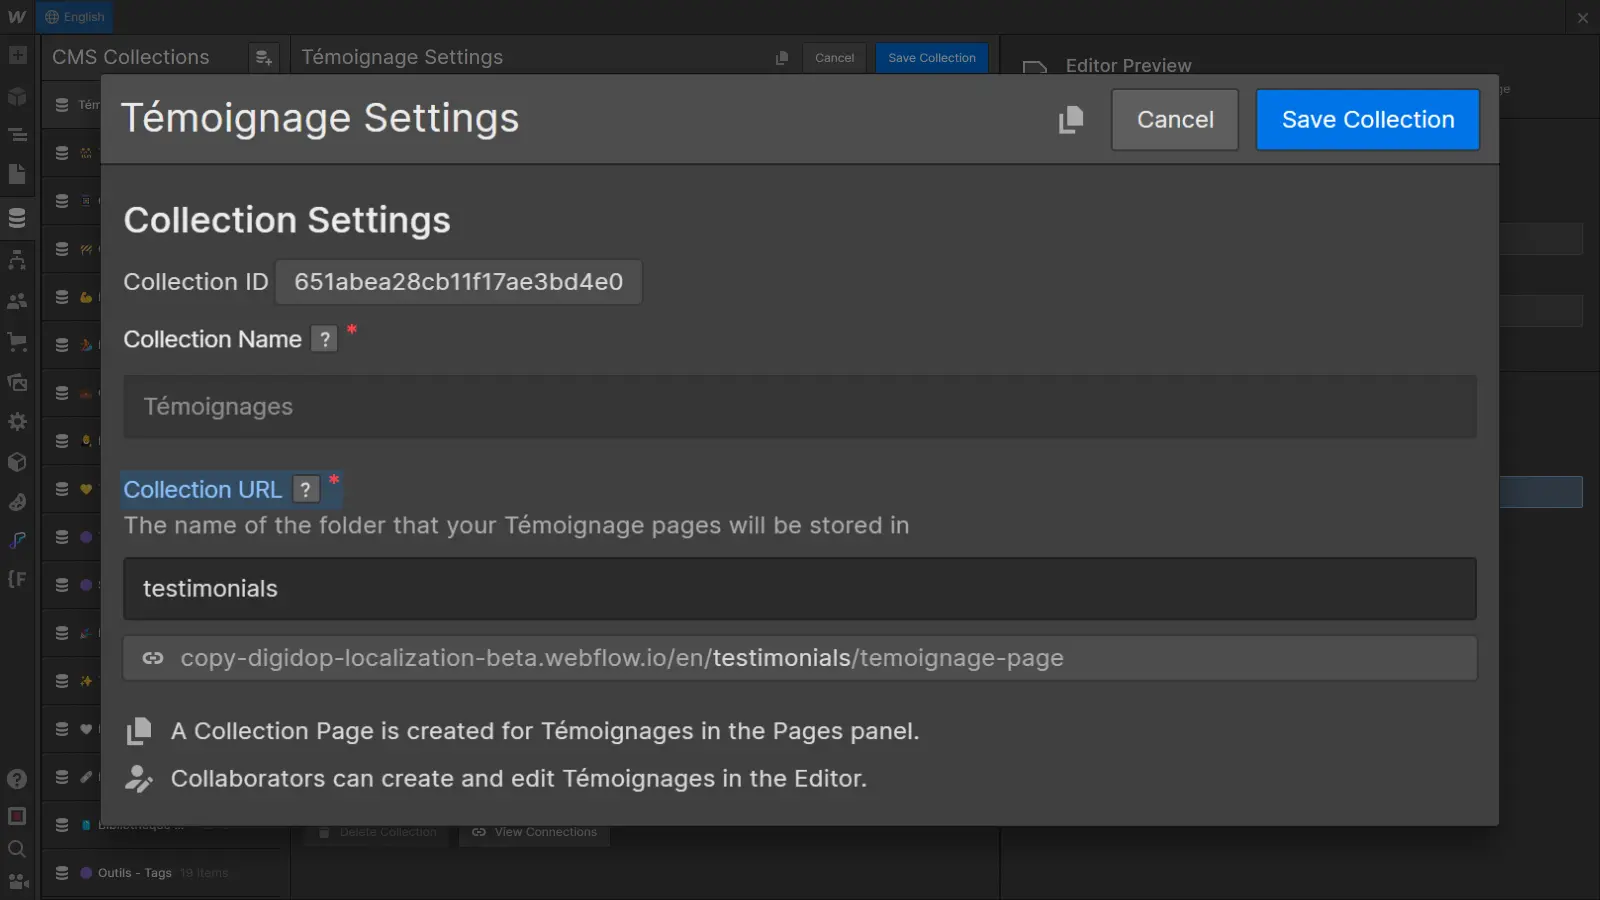
However, other collection options can’t be localized. Field names, help texts, and other settings remain common across all languages. The fundamental structure of collections is thus shared to ensure maximum consistency.
In the next step, we'll explore how to create localized items within these collections for a smooth multilingual user experience.
How to Localize Items?
Localizing items in Webflow's CMS offers a flexible approach to tailoring content for each language. Let’s dive into the process of creating, customizing, and managing localized items.
Creating Localized Items
When you create a new item in a collection, it is, by default, generated for all languages supported on your site. Any changes made to the base version of this new item are automatically applied to all language versions.
This ensures a coherent base, but what if you want to customize certain fields for a specific language? Let’s move on to item customization.
Customizing Localized Items
To customize a specific item for a given language (e.g., translating a testimonial), follow these steps:
- Start by creating a new item in your primary language (Locale) as you normally would. When you edit the fields of this item in your primary language, changes are, by default, applied to all languages.
- To localize a specific field (e.g., the testimonial), switch to the desired language using the language switch option at the top left of the Webflow Designer. Alternatively, you can select the desired language from the Locale list at the bottom of the item editing page.
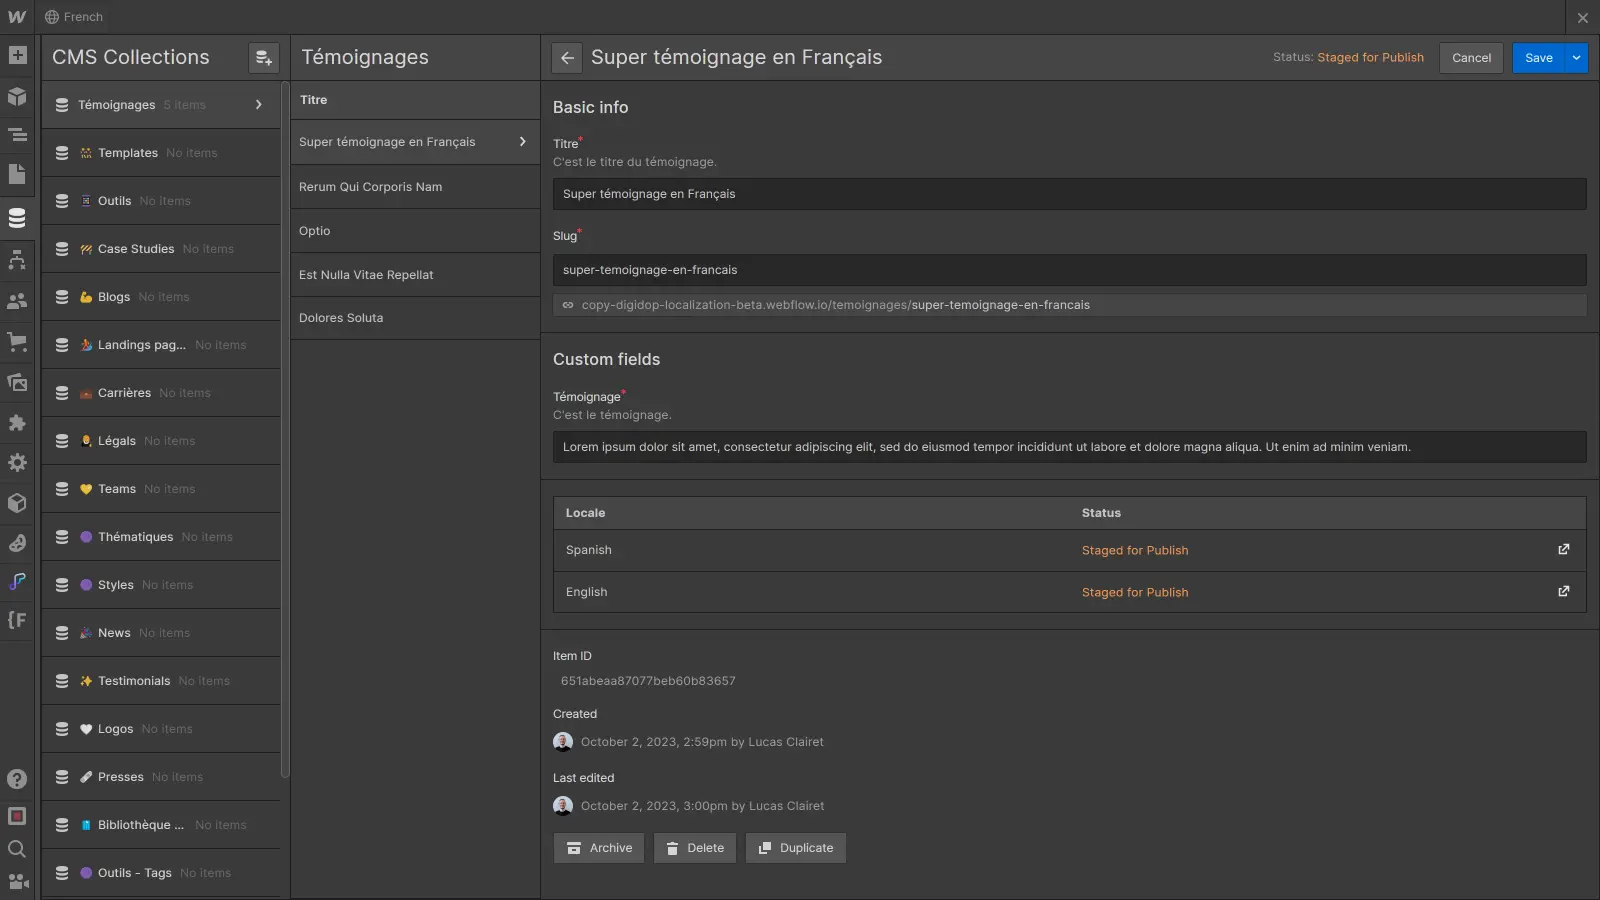
- Edit the fields according to the specific needs of this language (e.g., translate your title).
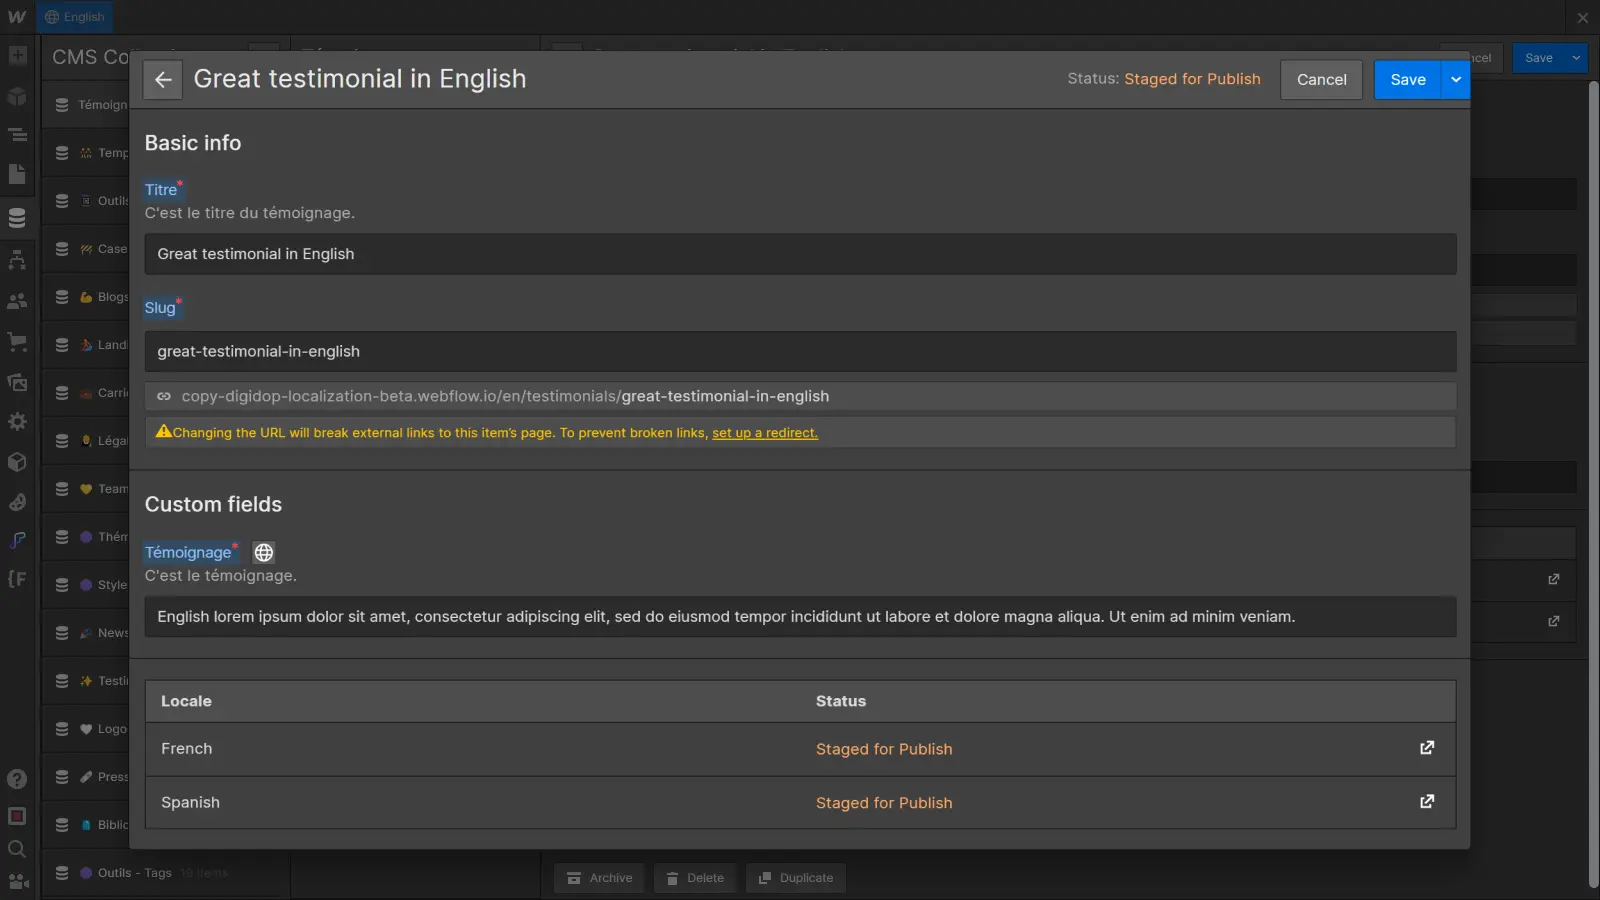
- Save the changes. Once a field has been localized, it will be specific to the respective language. Other fields that were not modified in the secondary language will continue to inherit values from the primary language.
Managing Distinct Items
Sometimes, you may need language-specific items that should not exist in other languages (e.g., a blog post dedicated to a regional event). You have two approaches:
- Removing the item in specific languages: In the item view, navigate to the relevant languages. Select the item and delete it. This approach is useful when you want certain elements to not exist in certain languages.
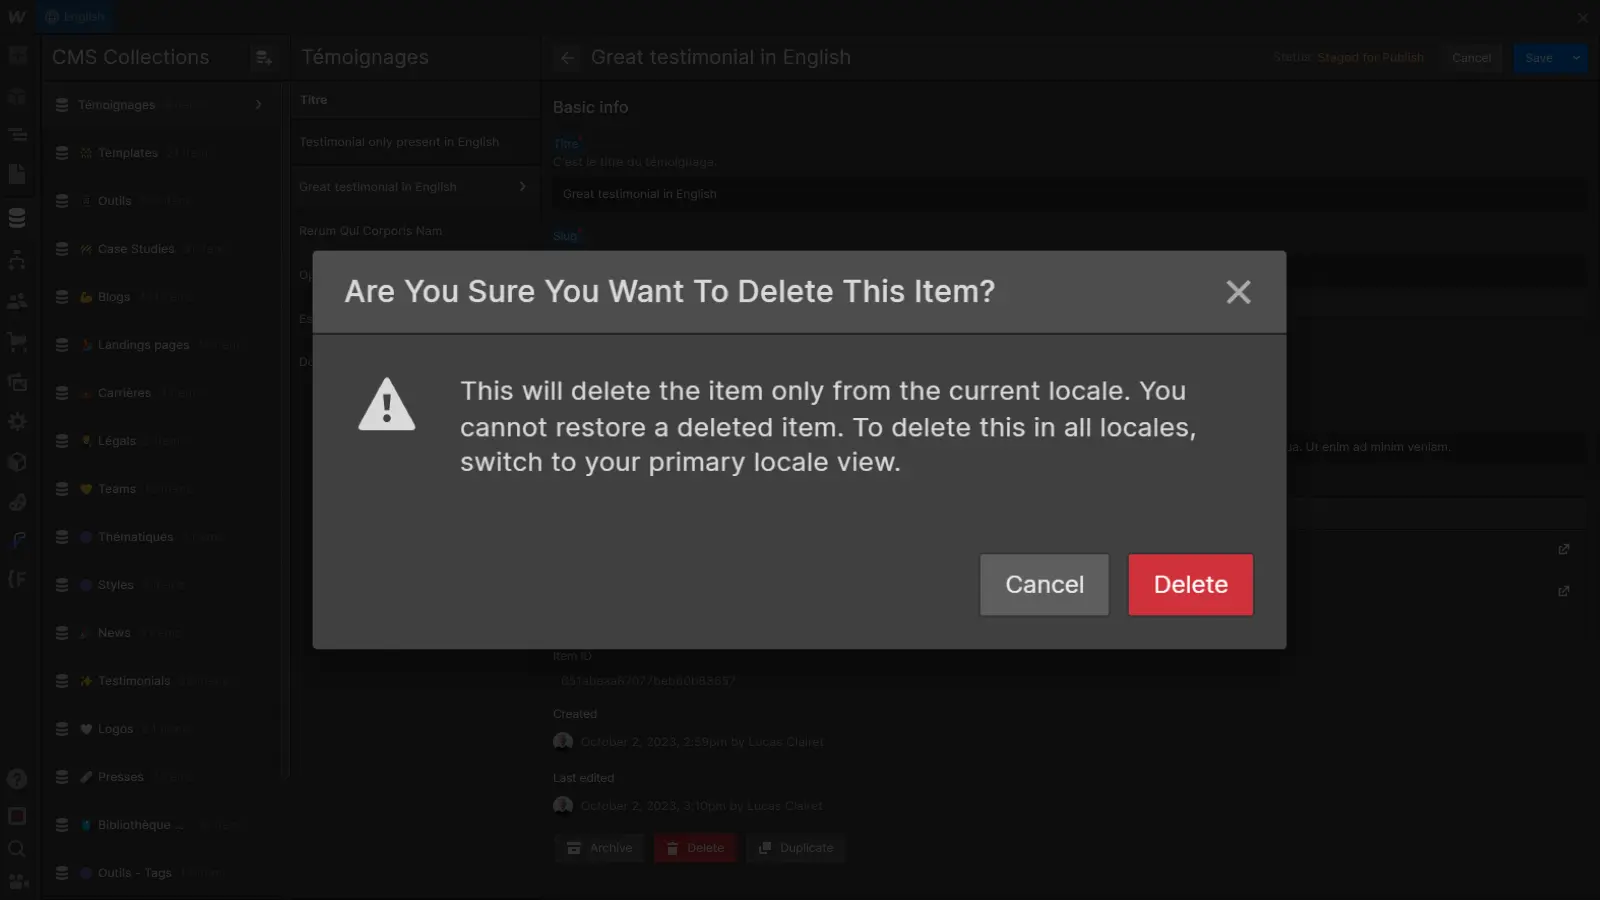
- Creating the item directly from a secondary language: If you know an item should only exist in a specific language, create it directly from that language view. The item will then only exist in that specific language.
Item management in Webflow’s CMS thus offers a high level of customization while ensuring global content consistency.
In the next section, we’ll explore how to use these localized collections on your Webflow pages.
Using Localized Collections
Once you’ve configured and localized your collections in Webflow’s CMS, it’s time to seamlessly integrate them into your pages. This section explores how to make the most of localized collections for a fluid and consistent user experience.
Adapted Collection Lists
When you add a Collection List to a page, Webflow automatically retrieves the appropriate items according to the page's language. Automating this process ensures visitors see content suited to their preferred language.
In the Designer, you can create Collection Lists as usual. Collection localization is managed automatically.
Customizing Collection Template Pages
You can customize collection template pages in the same way as static content. By accessing a collection’s template page, you can localize the page’s static content, adapt its design, and even localize SEO data according to the language.
- Localizing static content from the Designer: Use localization features to translate static text on the collection template pages.
- Localizing template design by language: With Webflow’s style localization, you can adapt template page designs according to the language.
- Localizing SEO data by language: To maximize search engine visibility in each language, you can also localize SEO data like titles and meta descriptions within the collection template pages.
By combining these elements, you create a seamless user experience, from the translation of textual content to the visual adjustment and SEO information optimized for each language.
In short, mastering CMS localization means fine-tuning the management of shared and language-specific content, offering both global consistency and local flexibility.
Finally, in the next section, we take a closer look at the creation of a language
to enable your users to navigate intuitively from one language to another.
Creating a Language Selector
To intuitively switch between languages, creating a tailored language selector is essential for any good multilingual site. With Webflow Localization, you can now achieve this using a brand-new element: the Locales List.
In this final section, we explore the steps involved in creating an effective language selector.
Introducing the New Locales List Element
The Locales List element, introduced by Webflow, is a valuable addition for multilingual site creators. This component, integrated directly into the Designer, simplifies creating a dynamic and customizable language selector.
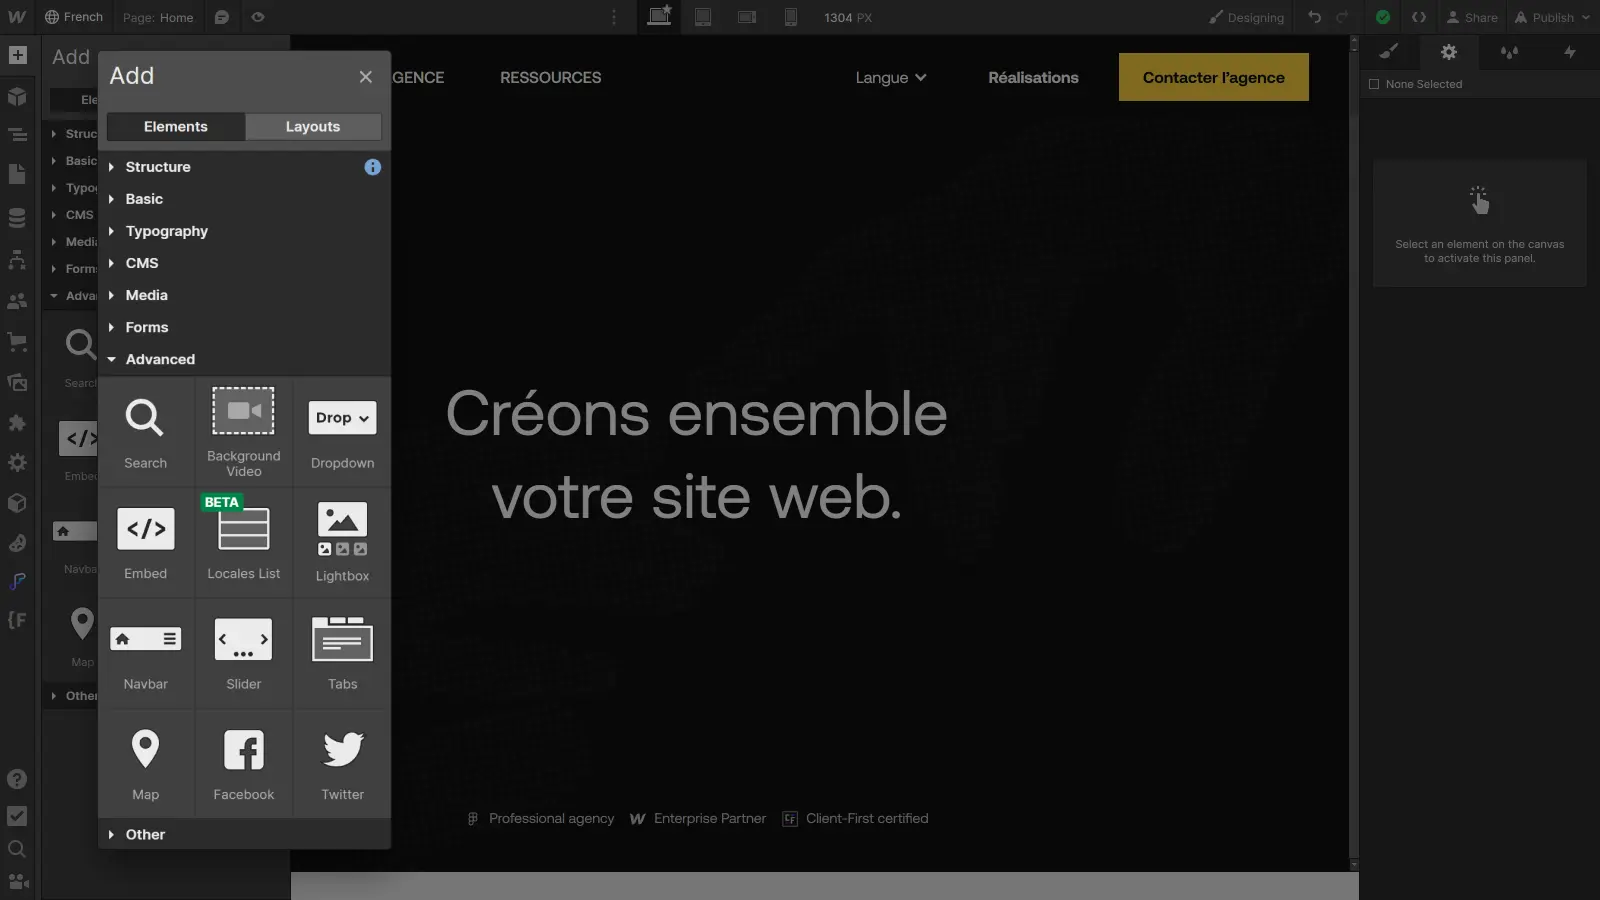
Key features include:
- Easy integration: Simply navigate to the elements panel in the Designer and drag the “Locales List” element to where you want it on your page.
- Flexible customization: Like a Collection List, the Locales List element acts as a container for all elements of a collection (in this case, the languages enabled on your site).
- Dynamic link with localization: The element connects to your localization settings and automatically displays all activated site languages.
Why Use It?
- Accessibility: Offer visitors an intuitive way to switch languages, enhancing their experience on your site.
- Harmonious design: Customize the Locales List appearance to seamlessly fit your overall design.
- Ease of implementation: No need to manage complex scripts; the element is ready to integrate and customize as needed.
The Locales List is an excellent tool to make your Webflow site truly multilingual. In the next section, we’ll see how to integrate this element into a functional language selector within a navigation bar.
Preparing the Language Selector
Before diving into creating the language selector, let’s prepare the structure.
For an effective and intuitive language selector, adding the Locales List element will come later. A better solution is to integrate it into a dropdown. A dropdown offers a more accessible solution for integrating a language selector.
Specifically, follow this structure:
- Add a Dropdown element inside your navbar.
- Inside the Dropdown List, add your Locales List.
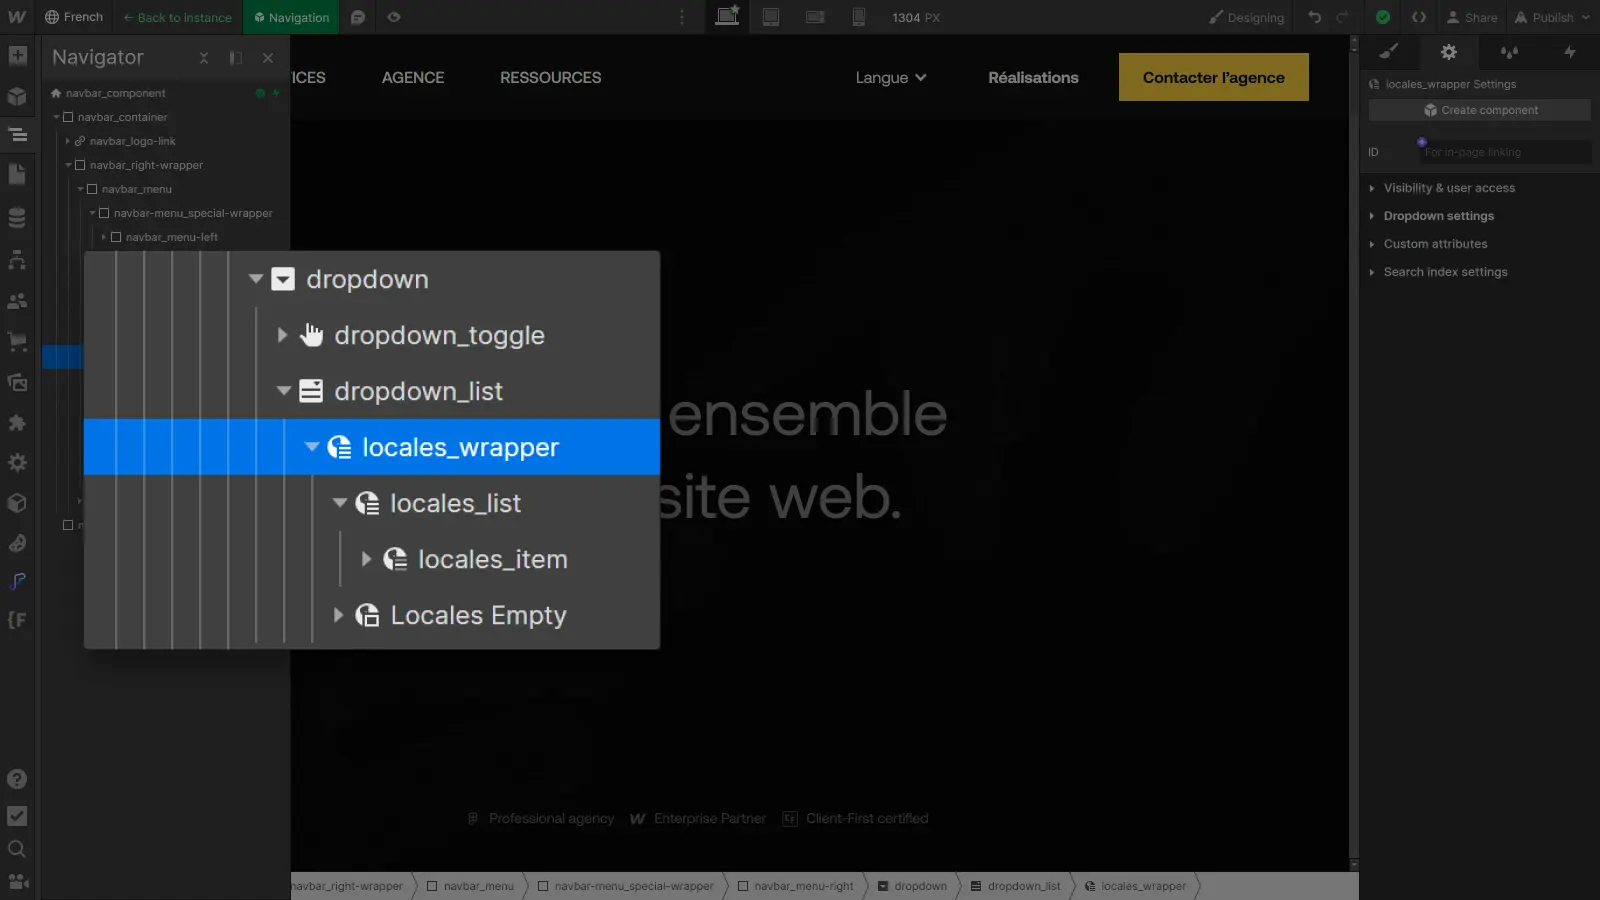
With this base structure in place, let’s move to Locales List integration to create a dynamic language selector.
Building the Language Selector
Once your structure is set, customize the Locales List according to your preferences.
The Locales List element works like a Collection List. Locales Wrapper, Locales List, and Locales Item elements are comparable to Collection List Wrapper, Collection List, and Collection Item elements.
- Customize the Locales Wrapper for the component container. For example, add a background and some padding.
- Customize the Locales List to adjust element distribution. For example, use a vertical flexbox with a 1rem gap.
- Customize the Locales Item to modify the items.
In addition, in the link options within the Locales Item element, you can choose to display either the chosen display name for the language (French) or its ISO code (FR), depending on what suits your design best.
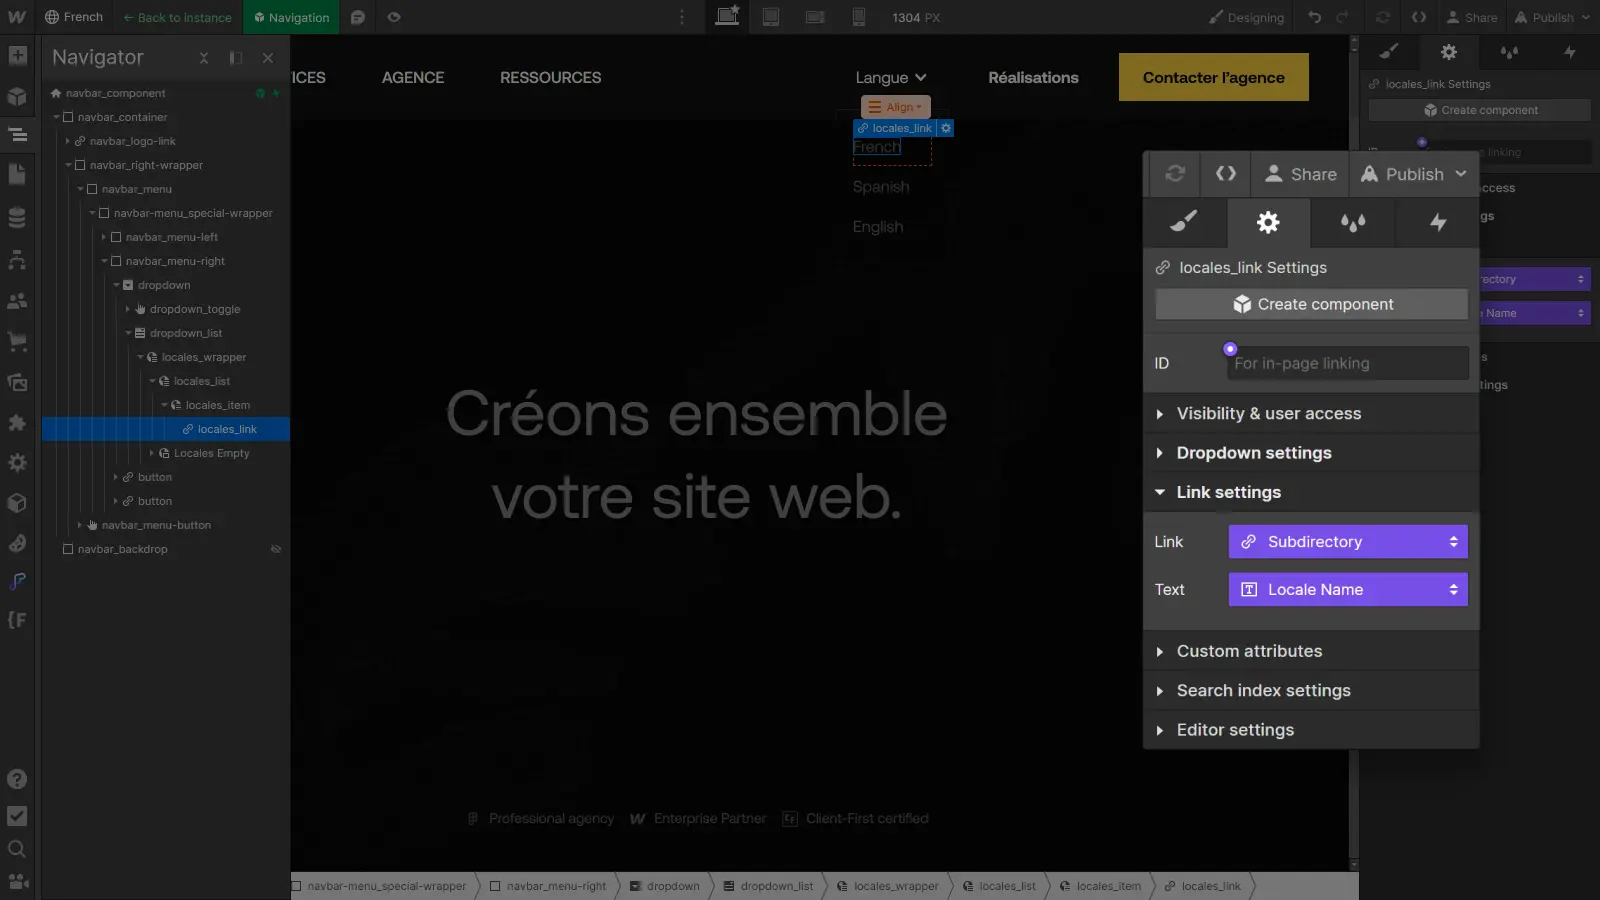
In brief, ensure that the Locales List appearance harmonizes with the general navbar design: experiment with styles, colors, and text styles for a perfect fit. By following these steps, you’ll have a language selector ready for your site.
Conclusion
Congratulations! You now have the keys to unlocking global reach with Webflow Localization. From careful content translation to dynamic design customization and multilingual SEO optimization, we’ve explored every corner of this new feature.
Remember, the key to success lies in understanding your audience. The more you understand your audience’s needs and preferences, the better you can tailor your site to create an exceptional user experience, regardless of the language.
Webflow Localization is a fantastic tool to leverage this understanding to its full potential, allowing you to create multilingual experiences without compromise!
To deepen your mastery of Webflow Localization, here are some additional resources:
- Webflow Localization: How to enable it to translate your site
- Webflow Localization: Translating page content on your site
- Webflow Localization: Adapting your pages’ design by language
- Webflow Localization: How to localize your site’s CMS
- Webflow Localization: Translating SEO options for a well-referenced multilingual site


